hope

A new day is coming,whether we like it or not. The question is will you control it,or will it control you?


  • Home

  • Archives

  • Code

  • Categories

  • Tags

  • Footprint

  • qRT-PCR

  • Project

  • Publish

  • SCI Figure

  • About

  • CV

  • Search

PBcR:SpecFiles Options

Posted on 2016-08-26 | In Bioinformatics | Comments: | Views: ℃
| Words count in article: | Reading time ≈

The spec file is an optional input to the runCA executive that launches the Celera Assembler pipeline. The spec files provides a convenient way to generate assemblies while documenting their parameters faithfully. The use of spec files is STRONGLY recommended.

Spec files参数解释

PBcR混合组装需要指定两个Spec配置文件: pacbio.spec(纠错)和asm.spec(组装)。这两个文件都包含特定的算法参数和计算机硬件参数,通常情况下算法参数可以忽略(此时将用软件默认值),但是计算机硬件参数需要根据实际情况调整。
所有参数均为option = value形式,其中的value为布尔型(boolean),即true=1,false=0。
Read more »

Perl,awk,sed One-Liners Explained, Part III: Selective Printing and Deleting of Certain Lines

Posted on 2016-08-18 | In Perl | Comments: | Views: ℃
| Words count in article: | Reading time ≈

sed -i 备份

1
sed -i.bak 's/:/;/' users

sed -i将会在原文件上执行sed命令,-i.bak将创建一个users.bak文件备份原users文件。

只在第N行进行替换

1
sed 'Ns/foo/bar/' test.txt

输出第N行

1
2
perl -ne '$.==N && print && exit' test.txt
awk 'NR==N' test.txt
Read more »

Perl,awk,sed One-Liners Explained, Part II: Text Conversion and Substitution

Posted on 2016-08-18 | In Perl | Comments: | Views: ℃
| Words count in article: | Reading time ≈

所有字符大写

1
perl -nle 'print uc' test.txt

所有字符小写

1
perl -nle 'print lc' test.txt

行首字母大写

1
2
3
perl -nle 'print ucfirst lc' test.txt
等同于
perl -nle 'print "\u\L$_"' test.txt

去掉每行行首空格

1
2
3
4
5
perl -ple 's^[ \t]+//' test.txt
awk '{ sub(/^[ \t]+/, ""); print }' test.txt
sed 's/^[ \t]*//' test.txt
等同于
perl- ple 's/^\s+//' test.txt

去掉从开头到结尾的空格

1
2
3
4
perl -ple 's/^[ \t]+|[ \t]+$//g' test.txt
awk '{ gsub(/^[ \t]+|[ \t]+$/, ""); print }' test.txt
awk '{$1=$1; print}' test.txt
sed 's/^[ \t]*//;s/[ \t]*$//' test.txt

sub和gsub区别:sub替换遇到的第一个字符,而gsub相当于全局替换;

转换DOS/Windows换行符为UNIX换行符

1
2
3
4
perl -pe 's|\r\n|\n|' test.txt
awk '{ sub(/\r$/,""); print }' test.txt
sed 's/.$//' test.txt
sed 's/^M$//' test.txt

替换A为S

1
perl -pe 's/A/S/g' test.txt

仅替换最后一个A为S

1
sed 's/\(.*\)A/\1S/' test.txt

在C行替换A为S

1
2
3
perl -pe '/C/ && s/A/S/g' test.txt
awk '/C/ { gsub(/A/, "S") }; { print }' test.txt
sed '/C/s/A/S/g' test.txt

awk 中sort排序

1
awk -F ":" '{print $1 | "sort"}' /etc/passwd

删除第二列

1
awk '{$2=""; print}' test.txt

每一列倒序输出

1
awk '{for (i=NF;i>0;i--) printf("%s ",$i); printf ("\n")}' test.txt

sed实现tac功能

1
sed '1!G;h;$!d' test.txt

参数解释:

1!G表示第一行不执行G命令;
$!d表示最后一行不执行d命令;

Perl, awk, sed One-Liners Explained, Part I: File Spacing, Numbering and Calculations

Posted on 2016-08-13 | In Perl | Comments: | Views: ℃
| Words count in article: | Reading time ≈

文件间距

两倍行距

1
2
3
4
5
6
7
8
9
10
11
12
13
14
15
16
17
18
19
20
21
22
23
cat test.txt
Marrys 2143 78 84 77 239
Jacks 2321 78 78 45 189
Toms 2122 48 77 71 196
Mikes 2537 87 97 95 279
Bobs 2415 40 57 62 159
perl -pe '$\="\n"' test.txt
Marrys 2143 78 84 77 239

Jacks 2321 78 78 45 189

Toms 2122 48 77 71 196

Mikes 2537 87 97 95 279

Bobs 2415 40 57 62 159

#最终one line perl命令行相当于如下循环
while (<>) {
$\ = "\n";
} continue {
print or die "-p failed: $!\n";
}

参数解释:

-e:命令行进入执行perl程序,而不需要编写perl脚本文件;
-p:相当于perl语言的while循环,遍历所有输入内容(input或<>),执行后面的命令并将结果传递给$_,最后print;

1
2
3
4
5
while (<>) {
# your program goes here
} continue {
print or die "-p failed: $!\n";
}

$\:相当于awk中的ORS,每次print时执行一次。
相同效果perl -pe ‘s/$/\n/‘ test.txt和perl -pe ‘$_ .= “\n”‘ test.txt


awk版awk ‘1; { print “” }’ test.txt = awk ‘{ print } { print “” }’ test.txt
简单粗暴sed版sed G test.txt两个换行符一个由G从保持空间传入交换到模式空间,另一个是sed流编辑器本身输出;
更多关于sed高级命令见Advanced-sed:n,N,d,D,p,P,b, T,t,h,H,g,G,x,y

两倍行距,除了空行

1
2
3
perl -pe '$_.="\n" unless /^$/' test.txt
#等同于
perl -pe '$_ .= "\n" if /\S/' test.txt

参数解释:

^$:表示空行;
\S:大写S,\S相对于\s,if /\S/结果就是匹配这一行包含至少一个非空(tab, vertical tab, space, etc)字符。


awk版awk ‘NF { print $0 “\n” }’ test.txt,空行时NF为0,可有效过滤掉空行。
简单粗暴sed版sed ‘/^$/d;G’ test.txt /^$/表示匹配空行,d表示删除,即首先将匹配到的空行全部删除,然后在执行G;
去掉两倍行距:sed ‘n;d’ test.txt,n表示读入下一行,即模式空间里同时每次存在两行内容;
注意:sed中-n和n的区别,例如sed -n ‘n;p’ test.txt,在一般 sed 的用法中,所有来自 STDIN的资料一般都会被列出到屏幕上。但如果加上 -n 参数后,则只有经过sed 特殊处理的那一行(或者动作)才会被列出来,而单引号中的n表示读取下一行到pattern space,由于pattern space中有按照正常流程读取的内容,使用n命令后,pattern space中又有了一行,此时,pattern space中有2行内容,但是先读取的那一行不会被取代、覆盖或删除;当n命令后,还有其他命令p的时候,此时打印出的结果是n命令读取的那一行的内容,即第二时间读入的,也就是n命令后的其他命令只能作用于第二时间入读发行,首次读入的不做任何n后面命令的处理;另为一个是N命令(将下一行添加到pattern space中,但将当前读入行和用N命令添加的下一行看成”一行”,一起被N后面的命令处理)。**

三倍行距

1
perl -pe '$\="\n\n"' test.txt

awk版awk ‘1; { print “\n” }’ test.txt = awk ‘{ print; print “\n” }’ test.txt
**简单粗暴sed版sed ‘G;G’ test.txt

N倍行距

1
perl -pe '$_.="\n"x7' test.txt

移除所以空行

1
2
3
4
5
6
7
8
9
10
11
perl -ne 'print unless /^$/' test.txt
#最终one line perl命令行相当于如下循环
LINE:
while (<>) {
print unless /^$/
}
#进一步可解释为
LINE:
while (<>) {
print $_ unless $_ =~ /^$/
}

-n:相当于如下while循环,while通过<>读入每一行,然后传递给$_;

1
2
3
4
LINE:
while (<>) {
# your program goes here
}

相同效果perl -lne ‘print if length’ test.txt,-l参数相当于chomps,去掉每一行结尾的换行符,然后检查这一行的长度,如果存在任何字符则检查结果为true,并输出这一行;

当有多行空行时仅留下一行

1
2
3
perl -00 -pe '' test.txt
#相同效果
perl -00pe0 test.txt

将所有空行压缩或展开成N个连续的

1
perl -00 -pe '$_.="\n"x4' test.txt

行编号

所有行编号

1
perl -pe '$_="$.$_"' test.txt

参数解释:

$.:包含输入内容的当前行数;
awk版awk ‘{print FNR “\t” $0}’ test.txt和awk ‘{ print NR “\t” $0 }’ test.txt,当同时读入两个文件时前者awk中第二个文件开始编号为1,而后者的第二个文件开始编号继续第一个文件后

仅非空行编号,空行依然输出

1
perl -pe '$_=++$a."$_" if /./' test.txt

参数解释:

/./:匹配除了换行符外的任何字符,即非空行;
awk版awk ‘NF {$0=++a “:” $0}; {print}’ test.txt其中”:”表示编号和原内容间分隔符。

仅非空行编号,空行不输出

1
perl -ne 'print ++$a. "$_" if /./' test.txt

几点区别:
$.与++$a.:前者计数input的所有行,后者仅计数非空行;
-p与-n:前者while循环自带print函数,后者没有,需要指定print;

所有行编号,但是仅输出非空行

1
perl -pe '$_ = "$. $_" if /./' test.txt

仅编号匹配指定模式的行,但其他行也无编号输出

1
perl -pe '$_=++$a. "$_" if /模式/' test.txt

仅编号和输出匹配指定模式的行

1
perl -ne 'print ++$a. "$_" if /模式/' test.txt

所有行编号,但仅输出匹配指定行的行编号

1
perl -pe '$_ = "$. $_" if /模式/' test.txt

所有行编号,并自定义输出形式

1
perl -ne 'printf "%-5d %s", $.,$_' test.txt

awk版awk ‘printf(“%5d : %s\n”, NR, $0)’ test.txt

运算

统计所有行数,包括空行

1
perl -lne 'END { print $. }' test.txt

awk版awk ‘END {print NR}’ test.txt

统计非空行

1
2
3
perl -le 'print scalar (grep {/./}<>)' test.txt
perl -le 'print ~~grep{/./}<>' test.txt
perl -le 'print~~grep/./,<>' test.txt

统计空行数

1
2
perl -lne '$a++ if /^$/; END {print $a+0}' test.txt #一行一行读入,较高效
perl -le 'print ~~grep{/^$/}<>' test.txt #在内存中读入文件全部内容

grep -c功能

1
2
perl -lne '$a++ if /regex/; END {print $a+0}' test.txt
awk '/Beth/ { n++ }; END { print n+0 }' test.txt

统计每一行数字总数

1
awk '{s=0; for (i=1;i<=NF;i++) s=s+$i} print s}' test.txt

取绝对值

1
2
awk '{for (i=1;i<=NF;i++) if ($i<0) $i=-$i; print}' test.txt
perl -alne 'print "@{[map { abs} @F]}"' test.txt

计算所有文件每行总和

1
perl -MList::Util=sum -alne 'print sum @F' test.txt test2.txt

输出每行最小值

1
perl -MList::Util=min -alne 'priint min @F' test.txt

统计匹配某一模式的行数

1
perl -lne '/模式/' && $t++; END {print $t} test.txt

英语原文:http://www.catonmat.net/blog/perl-one-liners-explained-part-one/

awk 匹配与取反,命令行传递参数

Posted on 2016-08-11 | In Linux | Comments: | Views: ℃
| Words count in article: | Reading time ≈

匹配

/FIN|TIME/ 匹配FIN或者TIME;

取反

!~

取出第一列以外的其他列

awk ‘{$1=””;print }’ file.txt

第N列和M列外的其他列

awk ‘{\$1=\$3=”” ;print }’ file.txt

拆分文件

1
2
3
4
5
6
7
8
9
10
11
12
13
14
15
16
17
18
19
$ cat netstat.txt
Proto Recv-Q Send-Q Local-Address Foreign-Address State
tcp 0 0 0.0.0.0:3306 0.0.0.0:* LISTEN
tcp 0 0 0.0.0.0:80 0.0.0.0:* LISTEN
tcp 0 0 127.0.0.1:9000 0.0.0.0:* LISTEN
tcp 0 0 coolshell.cn:80 124.205.5.146:18245 TIME_WAIT
tcp 0 0 coolshell.cn:80 61.140.101.185:37538 FIN_WAIT2
tcp 0 0 coolshell.cn:80 110.194.134.189:1032 ESTABLISHED
tcp 0 0 coolshell.cn:80 123.169.124.111:49809 ESTABLISHED
tcp 0 0 coolshell.cn:80 116.234.127.77:11502 FIN_WAIT2
tcp 0 0 coolshell.cn:80 123.169.124.111:49829 ESTABLISHED
tcp 0 0 coolshell.cn:80 183.60.215.36:36970 TIME_WAIT
tcp 0 4166 coolshell.cn:80 61.148.242.38:30901 ESTABLISHED
tcp 0 1 coolshell.cn:80 124.152.181.209:26825 FIN_WAIT1
tcp 0 0 coolshell.cn:80 110.194.134.189:4796 ESTABLISHED
tcp 0 0 coolshell.cn:80 183.60.212.163:51082 TIME_WAIT
tcp 0 1 coolshell.cn:80 208.115.113.92:50601 LAST_ACK
tcp 0 0 coolshell.cn:80 123.169.124.111:49840 ESTABLISHED
tcp 0 0 coolshell.cn:80 117.136.20.85:50025 FIN_WAIT2

按第6列分隔文件,其中的NR!=1表示不处理表头。

1
2
3
4
5
6
7
8
9
10
11
12
13
14
15
16
17
18
19
20
21
22
23
24
25
26
27
28
29
30
31
32
33
$ awk 'NR!=1{print > $6}' netstat.txt

$ ls
ESTABLISHED FIN_WAIT1 FIN_WAIT2 LAST_ACK LISTEN netstat.txt TIME_WAIT

$ cat ESTABLISHED
tcp 0 0 coolshell.cn:80 110.194.134.189:1032 ESTABLISHED
tcp 0 0 coolshell.cn:80 123.169.124.111:49809 ESTABLISHED
tcp 0 0 coolshell.cn:80 123.169.124.111:49829 ESTABLISHED
tcp 0 4166 coolshell.cn:80 61.148.242.38:30901 ESTABLISHED
tcp 0 0 coolshell.cn:80 110.194.134.189:4796 ESTABLISHED
tcp 0 0 coolshell.cn:80 123.169.124.111:49840 ESTABLISHED

$ cat FIN_WAIT1
tcp 0 1 coolshell.cn:80 124.152.181.209:26825 FIN_WAIT1

$ cat FIN_WAIT2
tcp 0 0 coolshell.cn:80 61.140.101.185:37538 FIN_WAIT2
tcp 0 0 coolshell.cn:80 116.234.127.77:11502 FIN_WAIT2
tcp 0 0 coolshell.cn:80 117.136.20.85:50025 FIN_WAIT2

$ cat LAST_ACK
tcp 0 1 coolshell.cn:80 208.115.113.92:50601 LAST_ACK

$ cat LISTEN
tcp 0 0 0.0.0.0:3306 0.0.0.0:* LISTEN
tcp 0 0 0.0.0.0:80 0.0.0.0:* LISTEN
tcp 0 0 127.0.0.1:9000 0.0.0.0:* LISTEN

$ cat TIME_WAIT
tcp 0 0 coolshell.cn:80 124.205.5.146:18245 TIME_WAIT
tcp 0 0 coolshell.cn:80 183.60.215.36:36970 TIME_WAIT
tcp 0 0 coolshell.cn:80 183.60.212.163:51082 TIME_WAIT

if-else-if

1
2
3
$ awk 'NR!=1{if($6 ~ /TIME|ESTABLISHED/) print > "1.txt";
else if($6 ~ /LISTEN/) print > "2.txt";
else print > "3.txt" }' netstat.txt

统计

1
2
3
awk '{sum+=$5} END {print sum}' file.txt
awk 'NR!=1{a[$6]++;} END {for (i in a) print i ", " a[i];}' file.txt #输出非重复的第六列并计数
awk 'NR!=1{a[$6]+=$7;} END { for(i in a) print i ", " a[i]"KB";}' file.txt #输出非重复的第六列,其第七列对应值累加

shell脚本中传入参数

接收来自命令行传入的参数,第一个参数用\$1表示,第二个参数用\$2表示,以此类推;注意:\$0表示脚本文件名。

1
2
$ cat test.sh
cat $@ | awk -F, 'NR!=1 $79!~/\[M\+[0-9]\]+|\[M\][0-9]+/' > te.$@

$@表示所有的命令行参数;详细见http://www.runoob.com/linux/linux-shell-passing-arguments.html

awk -v参数

-v var=var_value
在awk程序执行前,把awk变量var的值设置为var_value,这个var变量在BEGIN块中也有效,经常用来把shell变量引入awk程序。

1
2
3
$a=1
$ awk -v var=$a 'BEGIN{print var}'
1

读入csv文件
awk -F, -v OFS=, ‘{print $1,$3}’ old.csv

Linux下XML::Simple无root权限安装

Posted on 2016-08-11 | In Perl | Comments: | Views: ℃
| Words count in article: | Reading time ≈

XML::Simple简介

XML::Simple 基本上有两个功能;它将 XML 文本文档转换为 Perl 数据结构(匿名散列和数组的组合),以及将这种数据结构转换回 XML 文本文档。提供了两个函数:XMLin() 和 XMLout()。第一个子函数读取 XML 文件,返回一个引用。给出适当数据结构的引用,第二个子函数将它转换为 XML 文档,根据参数的不同,产生的 XML 文档采用字符串格式或文件形式。

XML::Simple 有两个主要限制。首先,在输入方面,它将完整的 XML 文件读入内存,所以如果文件非常大或者需要处理 XML 数据流,就不能使用这个模块。第二,它无法处理 XML 混合内容,也就是在一个元素体中同时存在文本和子元素的情况.

为何需要XML::Simple

在用Trinotate: Transcriptome Functional Annotation and Analysis对De Novo转录组数据进行注释时,需要运行RNAMMER来识别rRNA转录本,同时将XML输出文件解析为gff结果;这一过程就需要XML::Simple这一模块;
否则将报错../rnammer error converting xml into gff

安装XML::Simple

XML::Simple模块的安装需要至少以下两个依赖包:XML::Parser和XML::SAX::Expat
注意:一定按照 XML::Parser、XML::SAX::Expat、XML::Simple的顺序依次安装;
XML::Parser一般可以在cpan下顺利安装,但是XML::SAX::Expat在正常的cpan安装将因为权限问题而中断:

1
2
3
4
5
6
$ perl -MCPAN -e shell
cpan> install XML::Simple
!!!!!!!!!!!!!!!!!!!!!!!!!!!!!!!!!!!!!!!!!!!!!!!!!!!!!!!!!!!!!!!!!!!!!!!!
ERROR: Can't create '/usr/local/share/man/man3'
Do not have write permissions on '/usr/local/share/man/man3'
!!!!!!!!!!!!!!!!!!!!!!!!!!!!!!!!!!!!!!!!!!!!!!!!!!!!!!!!!!!!!!!!!!!!!!!!

所以就涉及到在Linux下如何无root权限安装perl模块?
这里推荐更加好用,更加人性的cpanm,**在没有 Root 权限时会自动安装到当前用户家目录的perl/lib文件夹下。

cpanm安装

下载cpanm到自己的目录下,并修改可执行权限

1
2
$ wget  http://xrl.us/cpanm  --no-check-certificate -O cpanm 
$ chmod +x cpanm

将路径写到bashrc文件中

1
export PATH=~/software/perl/:$PATH

perl模块安装

XML::SAX::Expat

1
$ cpanm XML::SAX::Expat

注意:第一次安装时,cpanm会创建一个~/perl5目录,而perl模块的安装位置为~/perl5/lib/perl5,将这个变量写入bashrc文件的PERL5LIB变量中

1
2
3
export PERL5LIB=~/perl5/lib/perl5

source ~/.bashrc

验证安装
perldoc XML::SAX::Expat
输出正常帮助文档则表明安装成功;
cpanm还有更多用法,参见扶凯 blog使用 CPANMinus 来安装 Perl 模块和其它技巧

XML::Simple

1
$ cpanm XML::Simple

报错:

1
2
3
4
5
6
7
8
9
10
11
12
13
14
15
16
17
18
19
20
21
22
23
24
25
26
27
28
29
30
31
32
33
34
35
36
37
38
39
40
41
42
43
44
45
46
t/0_Config.t ............ ok
t/1_XMLin.t .............
Failed 84/132 subtests
t/2_XMLout.t ............ ok
t/3_Storable.t ..........
Failed 21/23 subtests
t/4_MemShare.t ..........
Failed 7/8 subtests
t/5_MemCopy.t ...........
Failed 6/7 subtests
t/6_ObjIntf.t ........... ok
t/7_SaxStuff.t ..........
Failed 12/14 subtests
t/8_Namespaces.t ........ ok
t/9_Strict.t ............ ok
t/A_XMLParser.t ......... ok
t/B_Hooks.t .............
Failed 4/12 subtests
(less 3 skipped subtests: 5 okay)
t/release-pod-syntax.t .. skipped: these tests are for release candidate testing

Test Summary Report
-------------------
t/1_XMLin.t (Wstat: 139 Tests: 48 Failed: 0)
Non-zero wait status: 139
Parse errors: Bad plan. You planned 132 tests but ran 48.
t/3_Storable.t (Wstat: 139 Tests: 2 Failed: 0)
Non-zero wait status: 139
Parse errors: Bad plan. You planned 23 tests but ran 2.
t/4_MemShare.t (Wstat: 139 Tests: 1 Failed: 0)
Non-zero wait status: 139
Parse errors: Bad plan. You planned 8 tests but ran 1.
t/5_MemCopy.t (Wstat: 139 Tests: 1 Failed: 0)
Non-zero wait status: 139
Parse errors: Bad plan. You planned 7 tests but ran 1.
t/7_SaxStuff.t (Wstat: 139 Tests: 2 Failed: 0)
Non-zero wait status: 139
Parse errors: Bad plan. You planned 14 tests but ran 2.
t/B_Hooks.t (Wstat: 139 Tests: 8 Failed: 0)
Non-zero wait status: 139
Parse errors: Bad plan. You planned 12 tests but ran 8.
Files=13, Tests=367, 3 wallclock secs ( 0.11 usr 0.05 sys + 1.61 cusr 0.35 csys = 2.12 CPU)
Result: FAIL
Failed 6/13 test programs. 0/367 subtests failed.
make: *** [test_dynamic] Error 255
-> FAIL Installing XML::Simple failed.

可以看出是text时存在其他依赖包的缺失,解决办法如下:

1
2
3
4
5
6
7
8
9
10
$ cpanm XML::LibXML::SAX::Parser 
$ cpanm XML::LibXML::SAX
$ cpanm XML::SAX::PurePerl
$ cpanm XML::Simple
--> Working on XML::Simple
Fetching http://www.cpan.org/authors/id/G/GR/GRANTM/XML-Simple-2.22.tar.gz ... OK
Configuring XML-Simple-2.22 ... OK
Building and testing XML-Simple-2.22 ... OK
Successfully installed XML-Simple-2.22
1 distribution installed

more:https://bugzilla.redhat.com/show_bug.cgi?id=233003

Piwi-interacting RNA (piRNA)

Posted on 2016-06-08 | In molecular biology | Comments: | Views: ℃
| Words count in article: | Reading time ≈

PiRNA


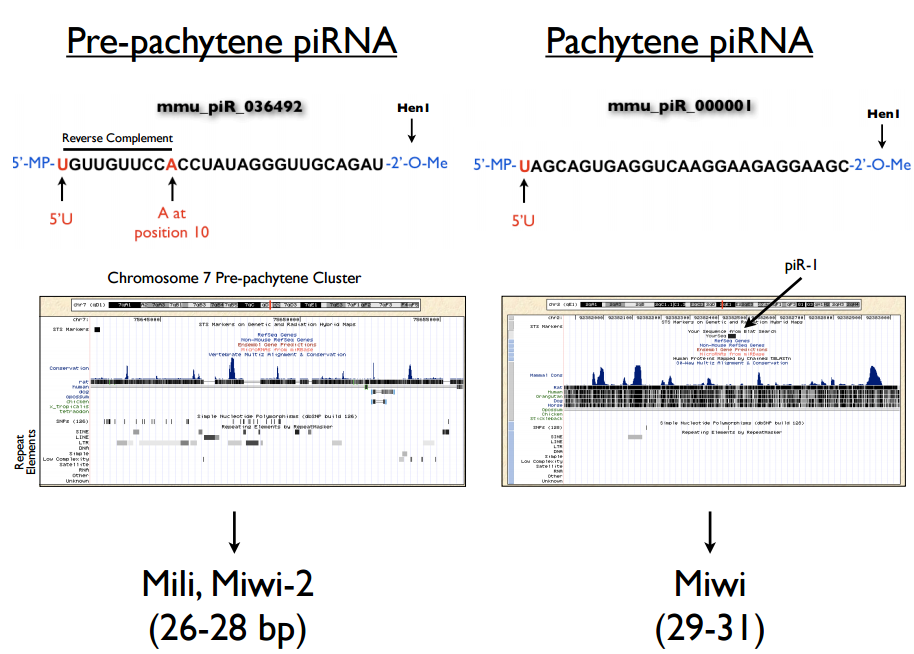
Piwi-interacting RNA (piRNA)是一大类主要在动物体内表达的small non-coding RNA,piRNA通过与Piwi蛋白互作形成RNA-protein复合体。该piRNA复合体在生殖细胞中参与表观遗传和逆转录转座子(retrotransposons)的转录后基因沉默。piRNA与miRNA和siRNA在长度、序列结构和生物起源上均存在差异;

PiRNA特点

1)26~31nt
2)无明显二级结构
3)5’端第一个碱基为U
4)5’端单磷酸盐(monophosphate)和3’端修饰(2’-O-methylation modification)阻止2’ or 3’氧化,增加PiRNA稳定性。
5)种类较多,不具一定的保守性,老鼠体内 50,000 unique piRNA,果蝇中>13,000。
6)产生存在显著的链偏好性;

位置

成簇贯穿基因组中,其每一个簇中包含PiRNA小于10个或达到成千上万,且大小差异极大。
在果蝇和脊椎动物中定位于非编码基因间,在线虫蛋白编码基因间也鉴定到PiRNA。
在无脊椎动物和哺乳动物生殖细胞中较多。
细胞核和细胞质中均存在。

生物起源

PiRNA的产生存在显著的链特异性,可能仅仅是来源于双链DNA的某一条链,这表明转录的长的单链前体经过一次初加工形成 pachytene PiRNA,这过程中PiRNA前体的转录趋向于起始于5’端第一个碱基U。


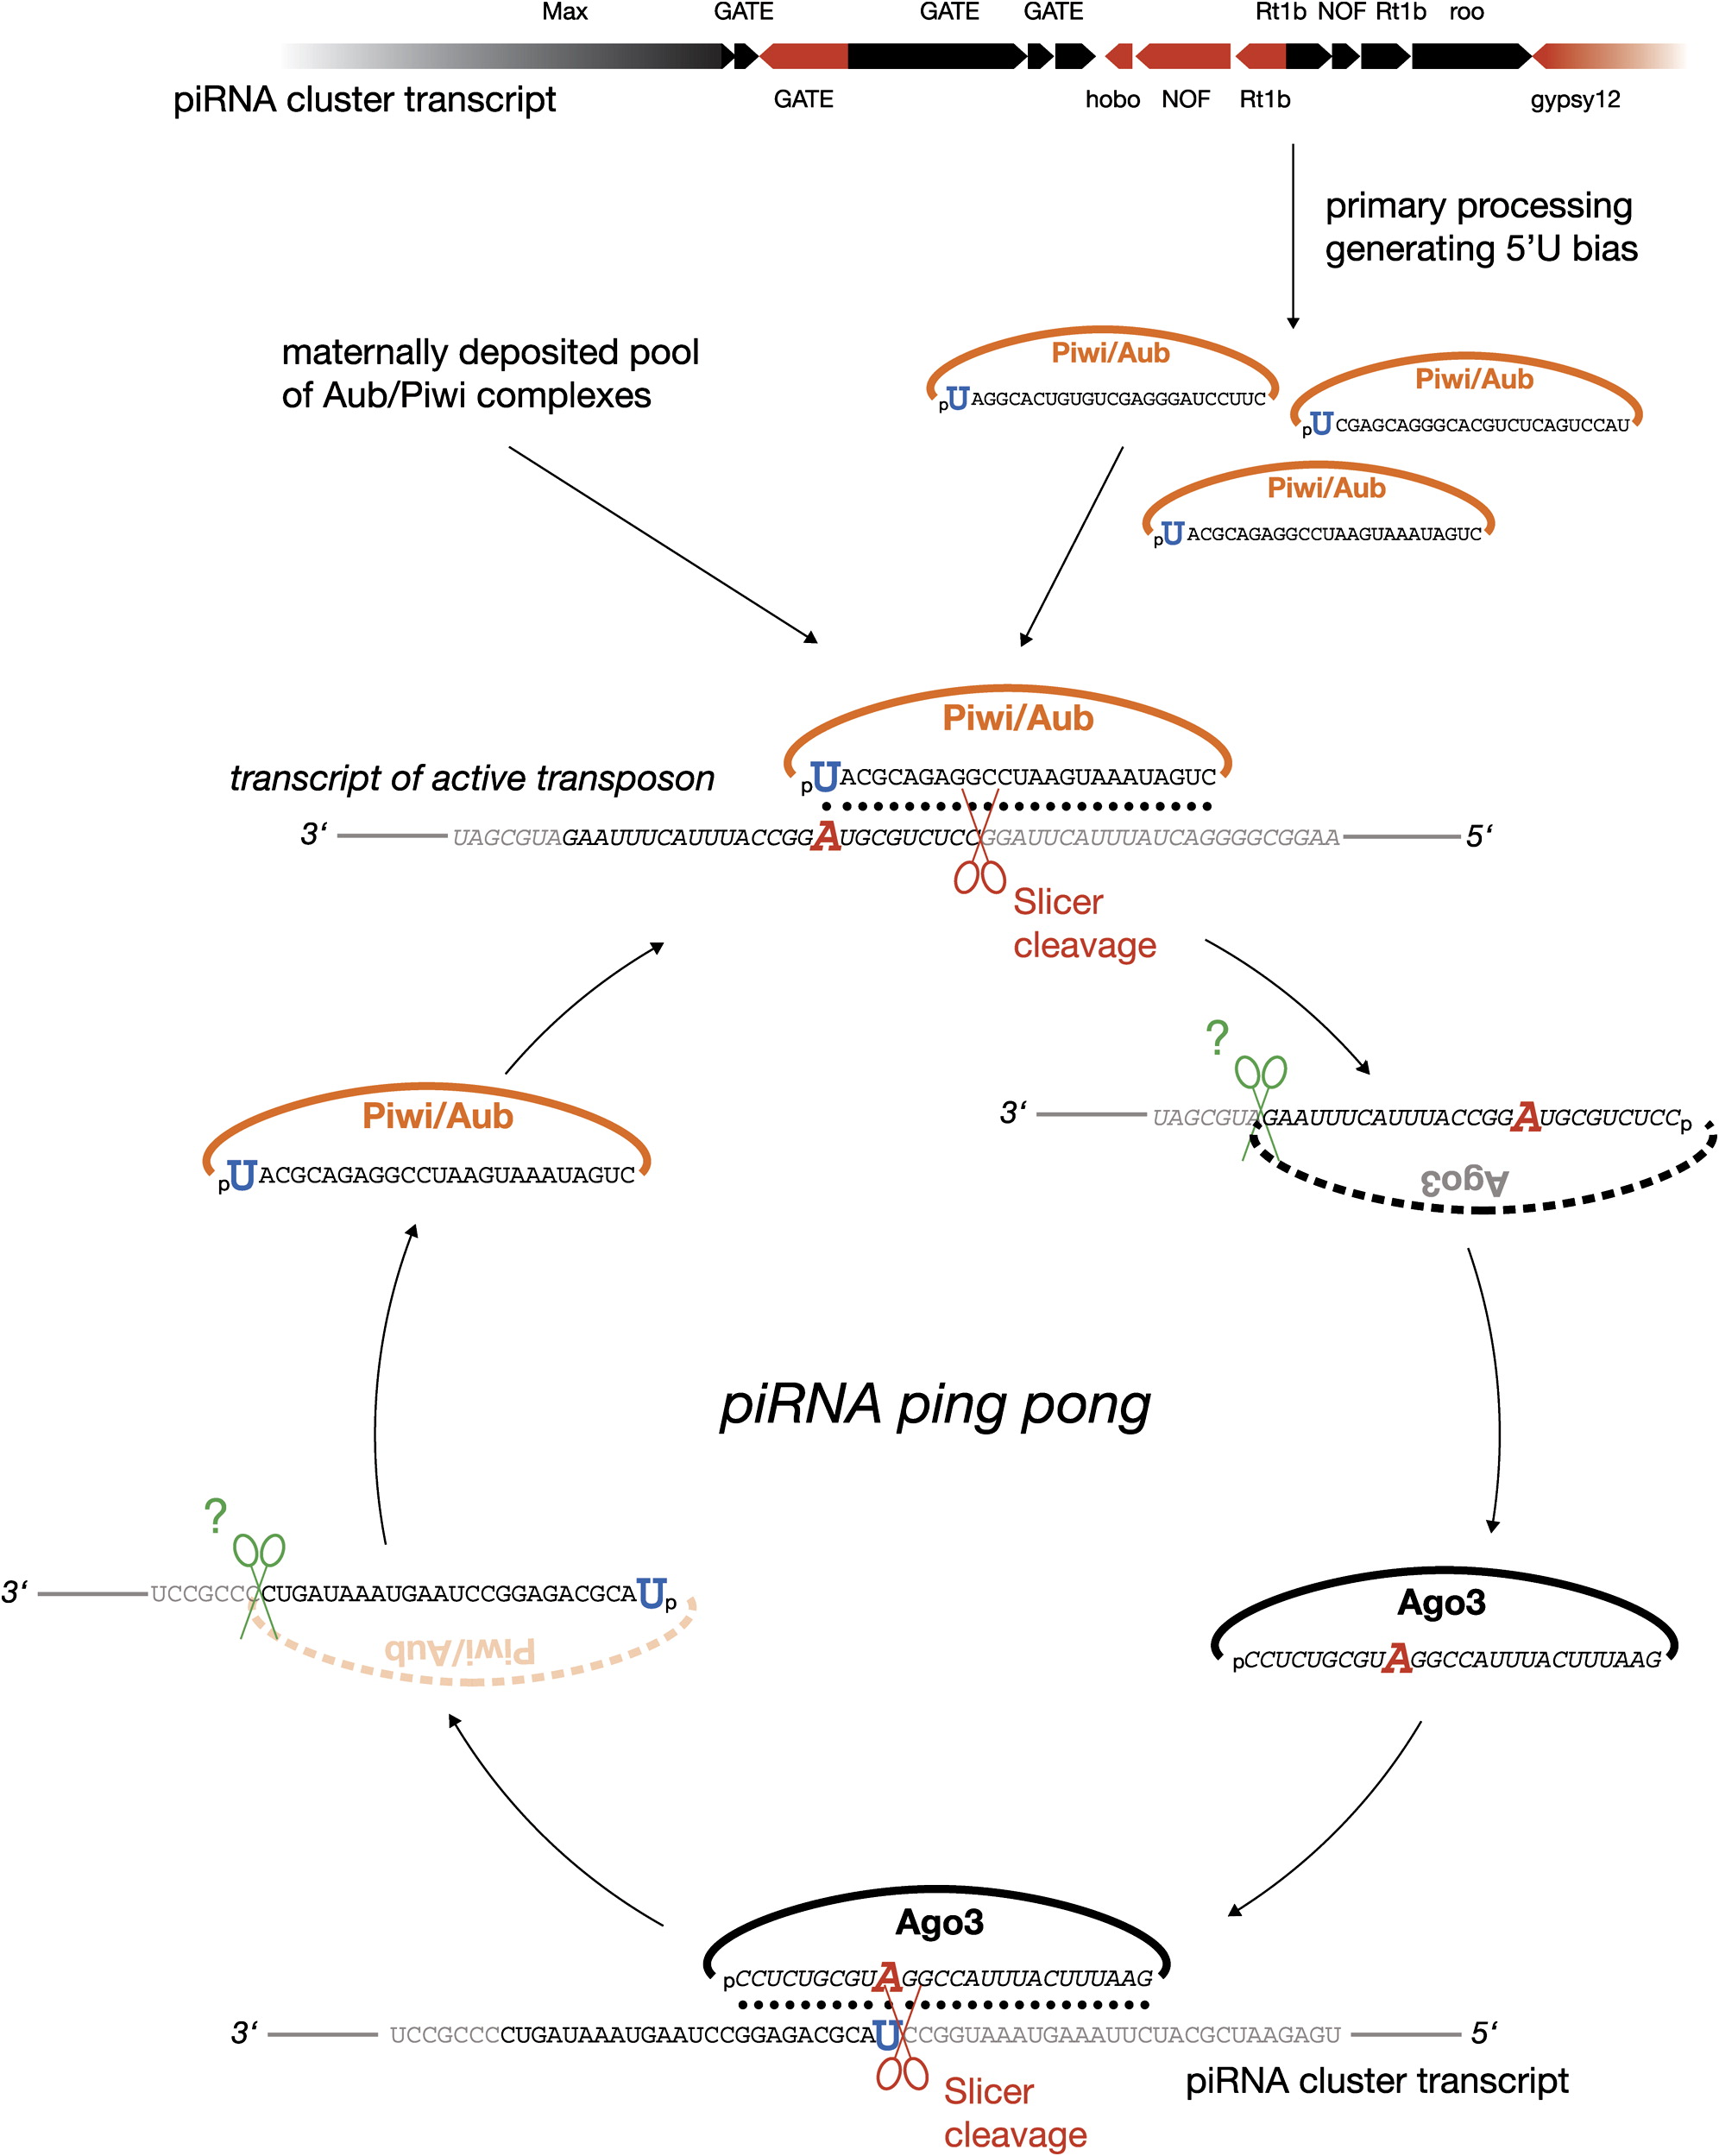
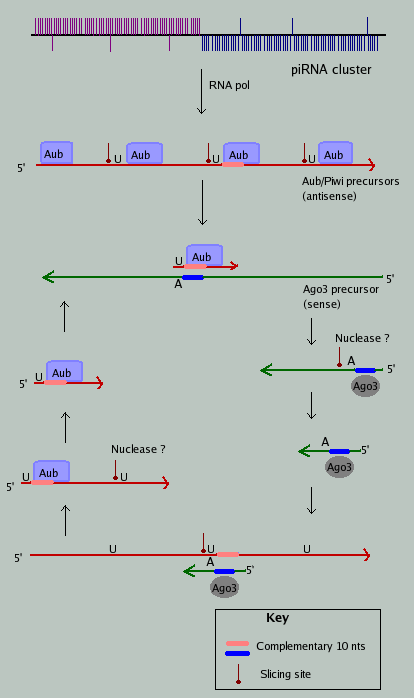
‘Ping Pong’机制:初级PiRNA(Primary piRNAs)第一个碱基位置偏向为U,第10个无偏向性;次级PiRNA(Secondary piRNAs)(产生于初级PiRNA指导的剪切)第一个碱基无偏向,第10个偏向A;二者从5’端开始有10个碱基的互补。
More:A piRNA Pathway Primed by Individual Transposons Is Linked to De Novo DNA Methylation in Mice
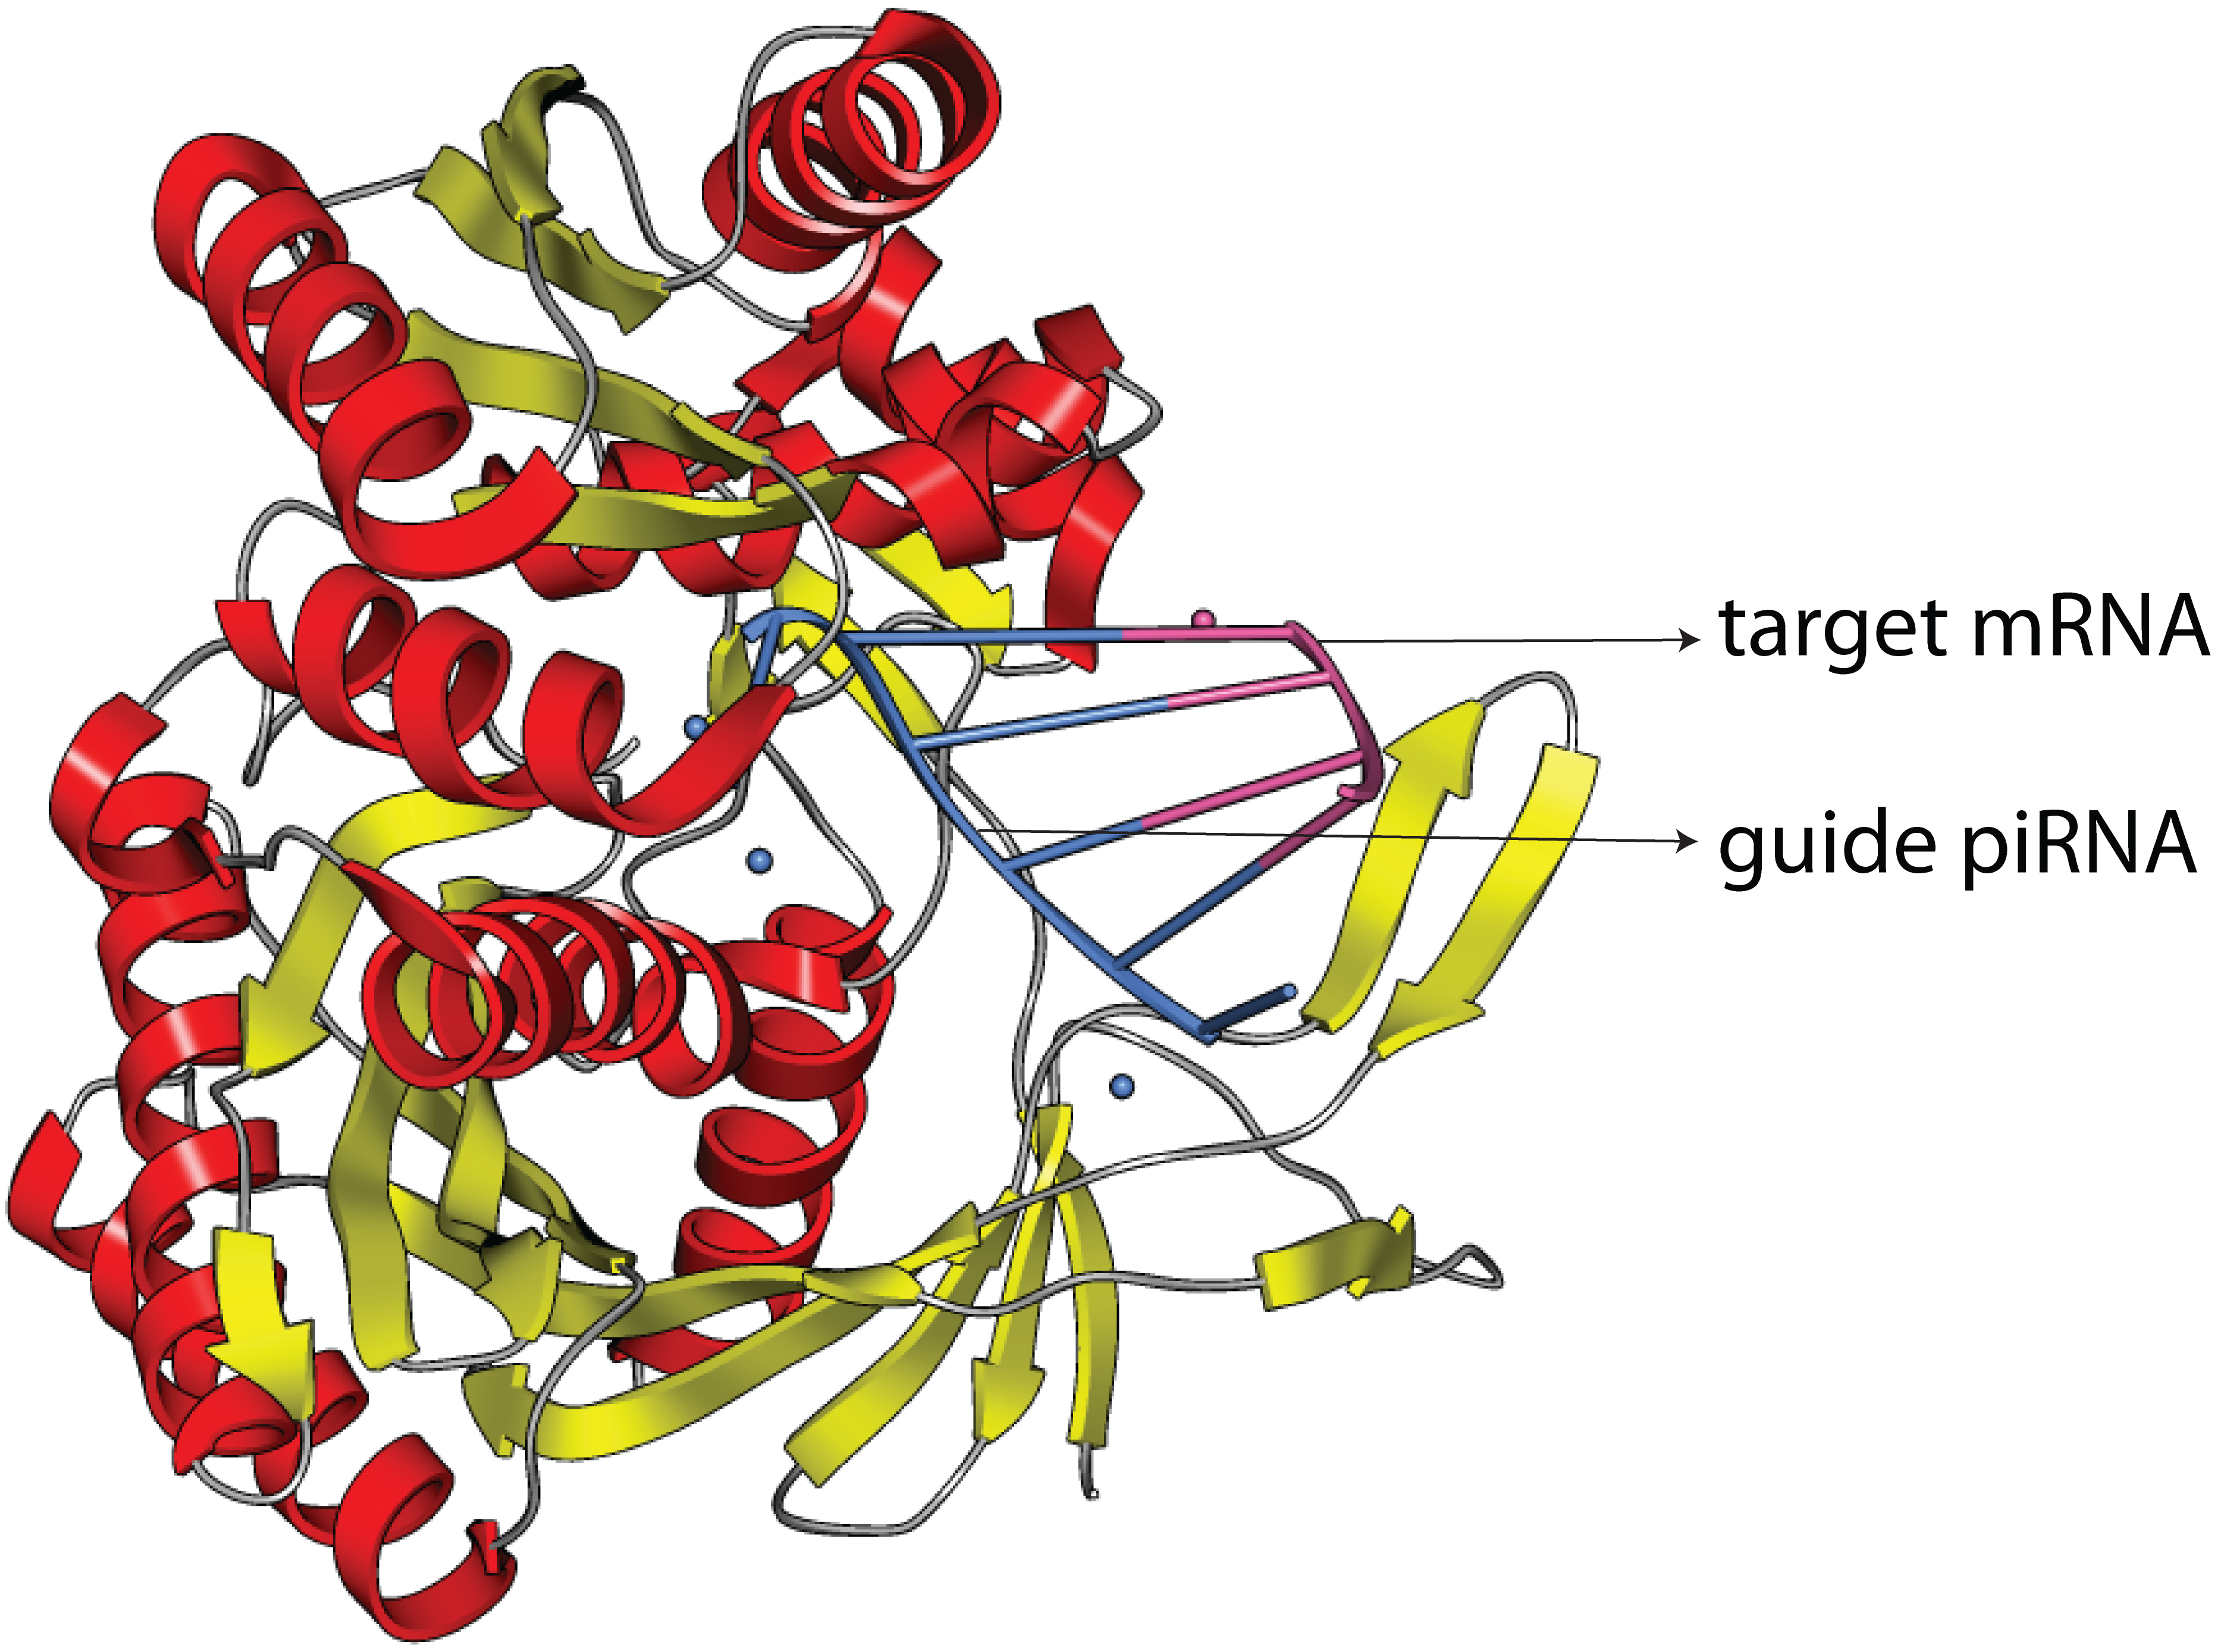
初级PiRNA识别其互补靶标并招募Piwi蛋白,然后从距离初级PiRNA 5’端10个碱基处劈开(识别的互补靶标)形成次级PiRNA,次级PiRNA靶向到第10个碱基是 A 。

Discrete Small RNA-Generating Loci as Master Regulators of Transposon Activity in Drosophila

生物功能

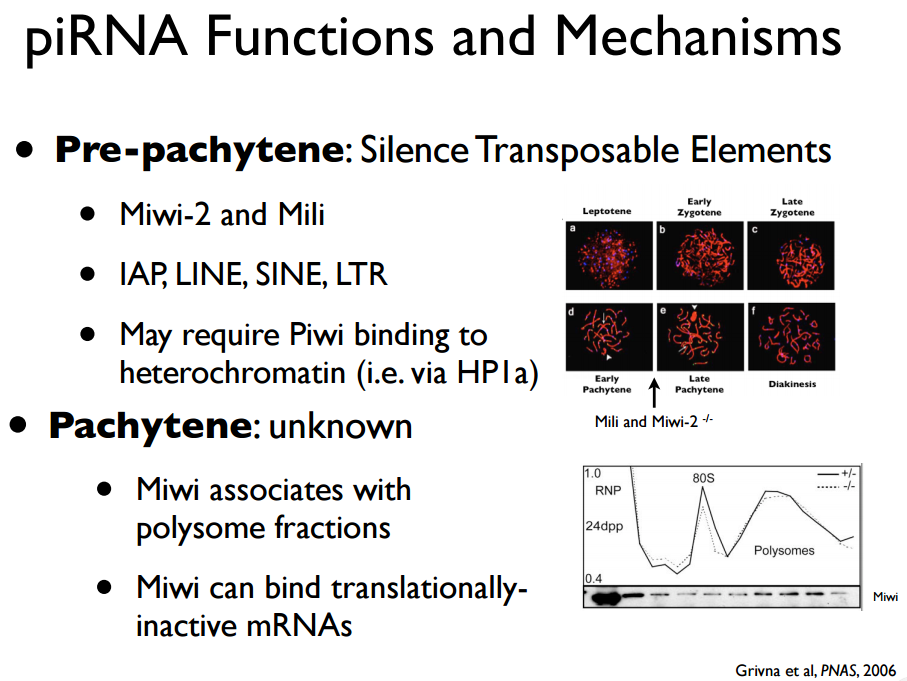
沉默转座子

见More:Piwi蛋白:RNAi中作用

后生效应(Epigenetic effects)

动植物中,小RNA通过特定的胞嘧啶甲基化来间接调控表观遗传,并且小RNA自身承担着表观遗传信息的载体。存在某些特殊转座子差异的果蝇品系间杂交能引起后代不育,这称之为杂种不育。当这一转座子是父系遗传时不育表型表现为显性,而母系遗传能够维持育性。在P- and I-element-mediated杂种不育中,依赖于父母本不同,其作用于每一个靶标元件(element)的PiRNA数量在后代表现出明显差异,这种差异来源于受精作用。综上表明母本生殖细胞内的PiRNA对上述特殊转座子的沉默响应起到重要作用,此沉默效应的缺失将引起杂种不育。
More:An epigenetic role for maternally inherited piRNAs in transposon silencing

PiRNA鉴定

PiRNA的鉴定目前主要通过识别’ping pong‘标签,相关软件如下:
piRNABank: a web resource on classified and clustered Piwi-interacting RNAs
PingPongPro:a software for finding ping-pong signatures and ping-pong cycle activity
proTRAC: a software for probabilistic piRNA cluster detection, visualization and analysis
piRNA cluster: database

PiRNA起源

基因组重复区域,例如逆转录转座子区;
异染色质区,双链RNA的反义链;

Argonaute蛋白家族


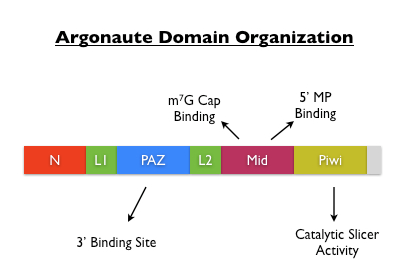
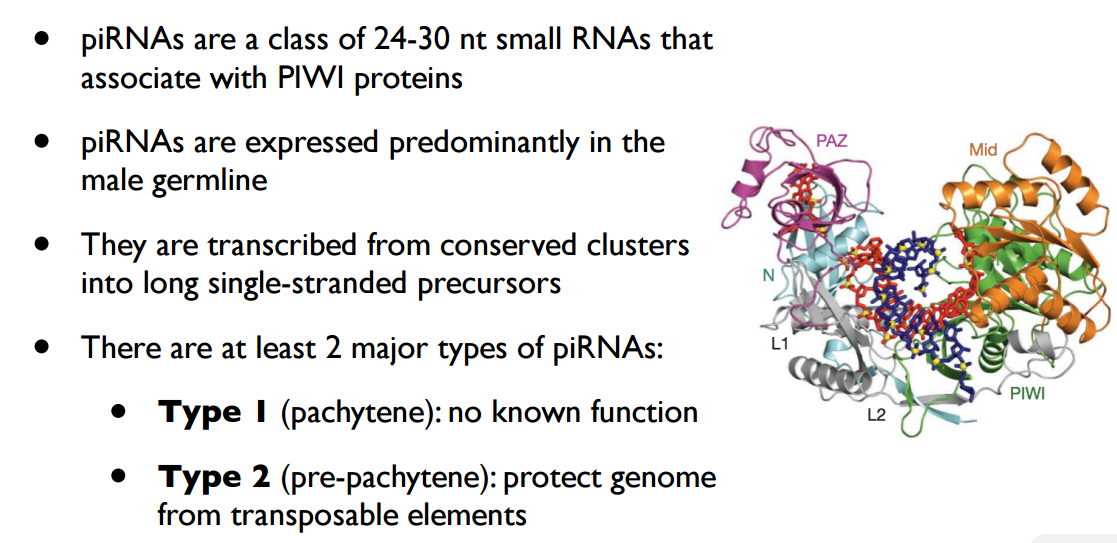
Argonaute蛋白包含有N-terminal, PAZ (Piwi-Argonaute-Zwille), middle and the C-terminal PIWI (P-element-induced wimpy testis) domains (Tolia et al., 2007)。
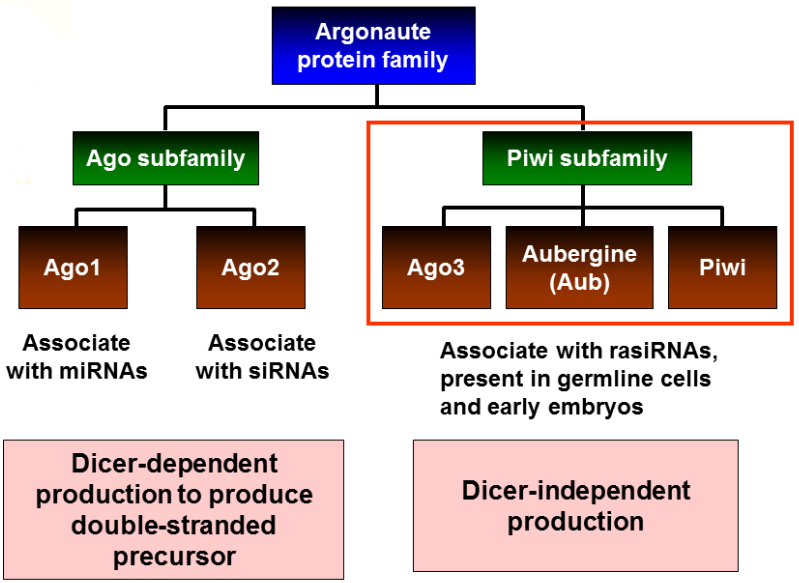
在果蝇中存在5种类型的Argonaute蛋白:AGO1, AGO2, Aubergine (Aub), Piwi and AGO3 (Gunawardane et al., 2007);
AGO1和AGO2属于Argonaute (AGO)亚家族,Aub, Piwi and AGO3多存在于生殖细胞系中,且属于PIWI亚家族;

Piwi蛋白

Piwi蛋白(最初在果蝇中的P-element induced wimpy testis),维持干细胞的不完全分化和生殖细胞细胞分裂比率的稳定性。Piwi蛋白高度保守,广泛存在于动植物体内。

RNAi中作用

Piwi蛋白存在有PAZ domain,该domain在Argonaute蛋白家族中参与双链RNA导向的单链RNA的水解作用。Argonaute是广泛研究的核酸结合蛋白(nucleic-acid binding)家族,其本质上是一种RNase H-like酶,完成RNA-induced silencing complex (RISC)的催化功能。在细胞RNAi反应中,RISC复合体中的Argonaute蛋白能够绑定(bind)到由ribonuclease Dicer切割(Dicer-2)外源双链RNA的正义链和反义链产生的siRNA(small interfering RNA)和切割(Dicer-1)内源非编码RNA(non-coding RNA)产生的miRNA(microRNA)上,从而形成RNA-RISC complex。该RNA-RISC complex绑定和切开与RNA(siRNA或miRNA)碱基互补的mRNA,破坏并且阻止其翻译过程。
补充RNAi中的RdRP机制:在线虫的研究中发现, siRNA 是合成 dsRNA 的特殊引物, 在RNA 依赖RNA 聚合酶(RdRP)作用下, 以靶mRNA 为模板合成dsRNA 。新生成的dsRNA 在Dicer 酶的作用下, 裂解产生新的siRNA , 新生成的siRNA 又可进入上述循环。大量集中的siRNA 可以形成RISC复合物, 这样可以提高mRNA 降解的效率。在这种RNAi过程中, 对靶mRNA 的特异性扩增有助于增强RNAi的特异性基因监视功能, 每个细胞只需少量的dsRNA就能完全关闭相应基因的表达,该模型称为RdRP。

Piwi蛋白和转座子沉默

Piwi蛋白通过与PiRNA形成内源系统来沉默内源自私基因(endogenous selfish genetic elements)表达,例如逆转录转座子和重复序列,防止该自私基因产物干扰生殖细胞的形成。
selfish genetic elements明显特征:通过形成额外拷贝数在基因组中传播(转座子)和对宿主的成功繁殖没有特殊贡献。

RasiRNA


RasiRNAs(Repeat associated small interfering RNA)是piRNA的亚种,与Piwi蛋白(Argonaute蛋白家族分枝)互作参与RNAi反应。在生殖细胞中建立和维持异染色质结构,控制重复序列的转录,沉默转座子和逆转录转座子。主要产生自反义链(antisense strand),缺乏动物siRNA and miRNA所特有的2’,3’羟基末端。
More:A Distinct Small RNA Pathway Silences Selfish Genetic Elements in the Germline

RNA 百科

RNA wiki

非Root用户编译安装GCC

Posted on 2016-06-04 | In Linux | Comments: | Views: ℃
| Words count in article: | Reading time ≈

Linux下源码安装软件三部曲都需要GCC编译,所以Linux下都会有预安装的GCC,但处于稳定性和兼容性考虑,其版本均为较低的稳定版,而最新软件的安装编译时需要较高版本才可以,对于非Root普通用户解决办法就是自己目录下安装所需版本GCC。
如何证明你的GCC版本需要升级呢?
当你安装软件make编译时看到如下报错,就说明该升级了:

1
2
g++ -std=c++11 -pedantic -Wall -Wextra    -c CCSSequence.cpp -o CCSSequence.o 
cc1plus: error: unrecognized command line option "-std=c++11"

-std=c++0x是g++-4.4支持的,而-std=c++11是g++-4.7及其后续版本。
gcc -v察看当前系统GCC版本,确认是否为GCC版本问题引起报错。

GCC安装

安装gcc之前依赖gmp、mpc、mpfr这三个包,所以先安装这个三个包,这三个包可以在下面的infrastructure目录下下载,gcc源码包在releases中下载,这里gcc下载的版本为gcc-4.8.5。
因为这三个包之间有依赖关系,所以一定按如下顺序依次安装。

gmp安装

1
2
3
4
5
6
7
8
9
10
11
$tar -jxvf gmp-4.3.2.tar.bz2

$cd gmp-4.3.2

$./configure --prefix=/home/software/opt/gmp-4.3.2/ #gmp安装路径

$make

$make check #这一步可以不要

$make install

mpfr安装

1
2
3
4
5
6
7
8
9
10
11
tar -jxvf mpfr-2.4.2.tar.bz2

$cd mpfr-2.4.2

$./configure --prefix=/home/software/opt/mpfr-2.4.2/ --with-gmp=/home/software/opt/gmp-4.3.2/ #congfigure后面是mpfr安装路径及依赖的gmp路径

$make

$make check #这一步可以不要

$make install

mpc安装

1
2
3
4
5
6
7
8
9
10
11
$tar -zxvf mpc-0.8.1.tar.gz

$cd mpc-0.8.

$ ./configure --prefix=/home/software/opt/mpc-0.8.1/ --with-gmp=/home/software/opt/gmp-4.3.2/ --with-mpfr=/home/software/opt/mpfr-2.4.2/

$make

$make check #这一步可以不要

$make install

更改~/.bashrc文件

安装完上述三个依赖包后设置环境变量 $LD_LIBRARY_PATH,即在bashrc文件添加如下内容:
因为系统的LD_LIBRARY_PATH中有两个相邻的冒号,编译gcc的导致通不过,所以先把这个变量自己重新定义一下,然后将上面装的三个包添加到该变量中

1
2
3
4
5
export LD_LIBRARY_PATH=/public/software/mpi/openmpi/1.6.5/intel/lib:/opt/gridview/pbs/dispatcher/lib:/public/software/compiler/intel/composer_xe_2013_sp1.0.080/compiler/lib/intel64:/public/software/compiler/intel/composer_xe_2013_sp1.0.080/mkl/lib/intel64:/usr/local/lib64:/usr/local/lib:/usr/local/otpserver/dependson_libs_x64

export LD_LIBRARY_PATH=~/opt/gmp-4.3.2/lib/:~/opt/mpfr-2.4.2/lib/:~/opt/mpc-0.8.1/lib/:$LD_LIBRARY_PATH

export LIBRARY_PATH=$LD_LIBRARY_PATH

不然会碰到错误 configure: error: cannot compute suffix of object files: cannot compile

gcc安装

完成依赖包的安装和环境设置后就可以开始GCC的安装了

1
2
3
4
5
6
7
8
9
$tar -jxvf gcc-4.8.5.tar.bz2

$cd gcc-4.8.5

$./configure --prefix=/home/software/opt/gcc-4.8.5/ --enable-threads=posix --disable-checking --disable-multilib --with-mpc=/home/software/opt/mpc-0.8.1/ --with-gmp=/home/software/opt/gmp-4.3.2/ --with-mpfr=/home/software/opt/mpfr-2.4.2/

make -j 10 #类似于使用10个线程编译,速度要快很多,此过程需要较长时间,中间不要间断。

make install

更改~/.bashrc文件

在文件中加入一下两句将gcc加入到环境变量中。

1
2
3
export PATH=/home/software/opt/gcc-4.8.5/bin/:$PATH

export LD_LIBRARY_PATH=/home/software/opt/gcc-4.8.5/lib/:~/opt/gcc-4.8.5/lib64/:$LD_LIBRARY_PATH

安装过程报错暨解决办法

Linux安装任何软件切记 路劲  路劲  路劲  要的事说3编!
路劲报错主要类型如下:
1)路劲缺失
解决:export PATH=”$PATH:/home/bin/amos-3.1.0/bin”相应缺失路径到.bashrc文件。
2)当前软件安装路径存在,如下面报错[configure-stage2-gcc] Error 1 。
3)意外路径存在于环境变量中,如下面blasr安装编译报错。

报错[configure-stage2-gcc] Error 1

1
2
3
4
5
6
contains current directory 
configure: error:
*** LIBRARY_PATH shouldn't contain the current directory when
*** building gcc. Please change the environment variable
*** and run configure again.
make[2]: *** [configure-stage2-gcc] Error 1

1)根据提示看出是LIBRARY_PATH环境变量不应该包含有当前安装GCC的路径,即我想要安装gcc路径为/honm/software/gcc-4.8.5/,那个echo $LIBRARY_PATH就不应该包含此路径。
2)若echo $LIBRARY_PATH输出结果为/usr/lib/x86_64-linux-gnu/:(注意结尾冒号),则同样会报错,解决办法就是去掉冒号/usr/lib/x86_64-linux-gnu/。
3)解决办法unset LIBRARY_PATH; ./configure -v。来源于http://stackoverflow.com/questions/8565695/error-compiling-gcc-4-6-2-under-ubuntu-11-10

报错[stage1-bubble] Error 2

1
2
3
make[1]: *** [stage1-bubble] Error 2
make[1]: Leaving directory `/np/linac/belloni/programs/gcc/gcc-build'
make: *** [all] Error 2

解决:主要由Error 1 报错引起的,在第一个报错解决后此错误消失。

后续编译其他软件报错

安装blasr报错如下:

1
2
3
4
5
6
7
8
g++ -std=c++11 -pedantic -Wall -Wextra    -c CCSSequence.cpp -o CCSSequence.o
/public/home/zpxu/bin/gcc-4.8.5/libexec/gcc/x86_64-unknown-linux-gnu/4.8.5/cc1plus: error while loading shared libraries: libmpc.so.2: cannot open shared object file: No such file or directory
make[3]: *** [CCSSequence.o] Error 1
make[3]: Leaving directory `/public/home/zpxu/bin/blasr_install/blasr/libcpp/pbdata'
make[2]: *** [libpbdata] Error 2
make[2]: Leaving directory `/public/home/zpxu/bin/blasr_install/blasr/libcpp'
make[1]: *** [all] Error 2
make[1]: Leaving directory `/public/home/zpxu/bin/blasr_install/blasr/libcpp'

报错原因在于blasr安装相关路径已经存在于系统环境变量中,注释掉.bashrc中相应路径。

make install后报错

1
/bin/llvm-tblgen: /usr/lib64/libstdc++.so.6: version `GLIBCXX_3.4.15' not found (required by /bin/llvm-tblgen)

解决办法:
I found the libstdc++.so.6.0.18 at the place where I complied gcc 4.8.1

Then I do like this

1
2
3
4
5
6

cp ~/objdir/x86_64-unknown-linux-gnu/libstdc++-v3/src/.libs/libstdc++.so.6.0.18 /usr/lib64/

rm /usr/lib64/libstdc++.so.6

ln -s libstdc++.so.6.0.18 libstdc++.so.6

problem solved.

GCC延伸阅读

Linux下gcc生成和使用静态库和动态库详解
Linux添加环境变量与GCC编译器添加INCLUDE与LIB环境变量


贡献来源:
http://favoorr.github.io/centos6.6-build-gcc5.2-from-source/
http://stackoverflow.com/questions/5216399/usr-lib-libstdc-so-6-version-glibcxx-3-4-15-not-found

linux下java安装和运行报错

Posted on 2016-05-31 | In Bioinformatics | Comments: | Views: ℃
| Words count in article: | Reading time ≈

Linux下安装java

java官网下载最新版本jdk:jdk-8u91-linux-x64.tar.gz。
按照官网说明安装:JDK Installation for Linux Platforms
最后配置环境变量:编辑.bashrc文件。

Linux服务器上java运行报错

1
2
3
Error occurred during initialization of VM
Could not reserve enough space for object heap
Could not create the Java virtual machine.

或者

1
2
Error occurred during initialization of VM 
Could not reserve enough space for code cache

根据报错提示主要是运行内存不足造成,解决办法如下:

1
set JAVA_OPTS=-Xms512m -Xmx512m -XX:MaxPermSize=256m

more:http://stackoverflow.com/questions/4401396/could-not-reserve-enough-space-for-object-heap

Circular RNAs

Posted on 2016-04-12 | In molecular biology | Comments: | Views: ℃
| Words count in article: | Reading time ≈

环形RNA研究历史

1>最早的环形RNA分子在20世纪70年代于RNA病毒中发现。(Viroids are single-stranded covalently closed circular RNA molecules existing as highly base-paired rod-like structures)


2>2012年,斯坦福大学和霍华德休斯医学研究所的科学家们发表在《Plos One》的一项研究首次证实在人体细胞的基因表达程序中,环形RNA分子而非线性RNA分子是一个更普遍的特征。


3>2013年2月,Nature头条:震惊遗传界的环状RNA,揭示出环状RNA(circRNA)是一类特殊的非编码RNA分子,与传统的线性RNA(linear RNA,含5’和3’末端)不同,circRNA分子呈封闭环状结构,不受RNA外切酶影响,表达更稳定,不易降解。在功能上,circRNA分子富含microRNA(miRNA)结合位点,在细胞中起到miRNA海绵( miRNA sponge)的作用,进而解除miRNA对其靶基因的抑制作用,升高靶基因的表达水平(近期研究显示,一个环状RNA-CDR1as (也称为ciRS-7) ,在其序列上有超过60个保守的miR-7结合位点,因此ciRS-7像海绵那样,将miR-7吸附到身上,进而影响miR-7靶标基因活性);这一作用机制被称为竞争性内源RNA(ceRNA)机制。通过与疾病关联的miRNA相互作用, circRNA在疾病中发挥着重要的调控作用。
Circular RNAs are a large class of animal RNAs with regulatory potency.Nature.Year published:(2013)DOI:doi:10.1038/nature11928:证实,在斑马鱼中表达这一环状RNA或敲除miR-7可以改变大脑发育。
Natural RNA circles function as efficient microRNA sponges.NatureYear published:(2013)DOI:doi:10.1038/nature11993:发现这一环状RNA的表达阻断了miR-7。它使得miR-7活性受到抑制,miR-7靶基因表达增高,研究人员推测这是因为这一RNA环捕获和失活了miR-7。


早期认为环形RNA通过”外显子反向剪接成环(back splice circularization)”形成,定位于细胞浆中;2013年9月,中科院生物化学与细胞生物学研究所陈玲玲组发现来源于内含子序列的ciRNAs,其生成依赖特定的成环关键核酸序列;成熟的ciRNAs定位在细胞核内并调控其本位基因的转录速度。
Circular Intronic Long Noncoding RNAs


4>2014年9月,中科院上海生命科学研究院的研究人员在新研究中证实,是内含子的互补序列介导了外显子环化。
Complementary Sequence-Mediated Exon Circularization


5>2016年2月,中科院上海生命科学研究院生物化学与细胞生物学研究所的研究员陈玲玲全面探讨了环状RNA(circRNA)的生物合成和新功能。真核细胞的环状RNA来自于mRNA前体(pre-mRNA)的反向剪接。虽然环状RNA通常表达水平较低,但它们的表达存在细胞和组织特异性。
The biogenesis and emerging roles of circular RNAs
延伸阅读
剪接体
内含子经常存在于真核生物的蛋白质编码基因(coding gene)中。在内含子里,需要有 5’ 供体剪接位点(5’ donor splice site)、3’ 受体剪接位点(3’ acceptor splice site)及剪接分枝位点(branch point)来进行剪接。剪接是由剪接体(Spliceosome)来催化,它是以五个不同的小核核糖核酸(snRNs) 以及不下于一百个蛋白质所组成的大型核糖核酸蛋白质复合物,称为小核核糖蛋白(snRNP)。snRNP 的 RNA 会与内含子行杂交反应(hybridization),并且参与剪接的催化反应。
snRNAs(small nuclear ribonucleoproteins)的作用
真核细胞有细胞核和细胞浆中都含有许多小RNA,它们约有100到300个碱基,每个细胞中可含有105-106个这种RNA分子。它们是由RNA聚合酶Ⅱ或Ⅲ所合成的,其中某些像mRNA一样可被加帽。在细胞核中的小RNA称为snRNA,而在细胞浆中的称为scRNA。但在天然状态下它们均与蛋白质相结合,故分别称为snRNP和scRNP。某些snRNPs和剪接作用有密切关系。有些snRNPs分别和供体及受体剪接位点以及分支顺序相互补。

环形RNA要点

  • 具有闭合环状结构,没有PolyA “尾巴”。
  • 不受RNA外切酶影响,表达更稳定,不易降解。
  • 序列高度保守,具有一定的组织、时序和疾病特异性。
  • 生物起源(Biogenesis)

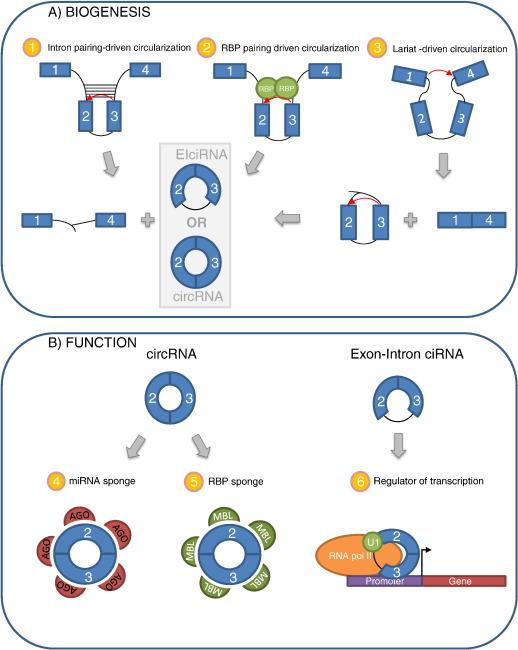
    剪切体(spliceosome): 剪切体抑制降低circRNA和线性RNA水平;circRNA表达受管控,剪切体能够区分正向剪切(linear RNA)和backsplicing(circRNA)。具体如何区分还不清楚,但3种环化机制已经识别,其共同点核心是相关剪切位点毗邻( juxtaposition),区别在于这种临近是如何实现的。more:http://www.sciencedirect.com/science/article/pii/S1874939915001455

    功能


    图注:1. 靠近环化外显子侧面的内含子存在互补序列motifs,直接的motifs区域碱基配对将环化的剪切位点拉进;

    1. RBPs(RNA bind protein)互作捆绑环化外显子侧面的内含子序列motifs区域,促进head-to-tail end-joining。
    2. 外显子跳跃导致包含外显子1和4的mRNA和包含外显子2和3的套索结构一样,这诱导外显子3的剪切供体和外显子2的剪切受体临近,随后的剪切形成EIciRNA(exon–intron ciRNAs)和circRNA,并伴随有外显子1和4组成的lines RNA。
    3. CircRNA包含miRNA结合位点时吸附AGO-miRNA complexes;
    4. 调控RBPs;
    5. exon–intron ciRNAs存在于核内,通过其保留的内含子的5‘剪切位点与U1 snRNP (U1)直接互作促进宿主基因的转录,exon–intron ciRNA-U1 complex招募RNA聚合酶 II(RNA pol II)刺激宿主基因转录起始。
      延伸阅读
      Specialised spliceosomes splice the introns out of pre-mRNA and seal the exon ends together, using the splicing consensus sequences at the intron/exon boundaries to identify the correct positions to splice. Sometimes a regulatory protein will mask a splicing sequence, resulting in alternative splicing. The spliceosomes consist primarily of RNA-protein complexes called small nuclear ribonucleoproteins (snRNPs). The snRNPs are composed of small nuclear RNAs (snRNAs) - U1, U2, U4, U5 and U6 - as well as a group of seven proteins known as Sm ribonucleoproteins that collectively make up the extremely stable Sm core of the snRNP. The snRNPs bind to the pre-mRNA in a specific order to align the splice sites for cleavage, which involves RNA-RNA pairing between the snRNA and the pre-mRNA with the help of the Sm proteins. The U1 snRNP binds to the 5’ end of the intron and the U2 snRNP binds close to the 3’ end of the intron (at the branch point), followed by the binding of the U4/U6 snRNPs that play an important role close to the reaction centre, and finally the U5 snRNP that helps hold the two exons together. After the intron is spliced out it is rapidly degraded, and the two exons are ligated together. More:http://www.ebi.ac.uk/interpro/potm/2005_5/Page1.htm
    1…678…15
    tiramisutes

    tiramisutes

    hope bioinformatics blog
    148 posts
    17 categories
    112 tags
    RSS
    GitHub E-Mail Weibo Twitter
    Creative Commons
    Links
    • qRT-PCR-Pipeline
    • GitBook《awk学习总结》
    • 棉花遗传改良团队
    • 生信菜鸟团-深圳大学城
    • 生信技能树
    • rabbit gao's blog
    • Huans(代谢+GWAS)
    • NSC-sequenceing
    • 伯乐在线
    • Linux开源中文社区
    • R-bloggers
    • R-resource
    • ggplot2
    • pele' blog
    © 2014 – 2023 tiramisutes
    Powered: Hexo
    |
    ▽ – NexT.Muse
    The total visits  times
    0%