hope

A new day is coming,whether we like it or not. The question is will you control it,or will it control you?


  • Home

  • Archives

  • Code

  • Categories

  • Tags

  • Footprint

  • qRT-PCR

  • Project

  • Publish

  • SCI Figure

  • About

  • CV

  • Search

添加系列表头的多种方法

Posted on 2016-10-01 | In Linux | Comments: | Views: ℃
| Words count in article: | Reading time ≈

想要在某文本开头 或/和 结尾添加一行?

awk版

BEGIN在开头添加,END在结尾添加;

1
awk 'BEGIN{print "START"}; {print}; END{print "END"}'

sed版

sed用 1来匹配第一行,i执行插入操作,$匹配最后一行,a执行追加,

1
sed -e $'1i\\\nSTART' -e $'$a\\\nEND'

echo版

在管道 |操作符中用{命令1;命令2;命令3…}来执行多个命令并告诉程序这是单个复合命令。

1
2
3
content-generator |
{ echo START; cat; echo END; } |
postprocessor

忽视第一行

1
2
3
4
#head打印第一行,tail生成其他行来排序
head -n 1 table.txt && tail -n +2 table.txt | sort -nr -k1
#首先将第一行存储到一个变量中
foo=$(head -n 1 table); echo -e "$foo"; tail -n +2 table | sort -nr -k1

忽略第一行,从第二行开始添加行号

1
foo=$(head -n 1 table); echo -e "Record\t$foo"; tail -n +2 table | nl | sed 's/^[ ]*//'

删除第一行

1
2
3
4
awk 'NR!=1'
awk 'NR>1'
tail -n +2
sed '1d'

添加系列多表头

如需添加M1,M2….M2016,一系列由字母和数字组合的表头?

1
echo M{1..2016}; cat text.txt

在指定位置插入一列并赋值

1
awk '{$3=NR==1?"add" OFS $3:"hope" OFS $3} 1' OFS="\t\t" text.txt

按第一列将文件拆分并添加表头

1
2
3
4
5
6
7
8
9
10
11
12
13
14
15
16
cat mainfile.txt
file1 abc def xyz
file1 aaa pqr xyz
file2 lmn ghi xyz
file2 bbb tuv xyz
#单纯的按照第一列分隔文件
awk '{FILENAME=$1; print >>FILENAME}' mainfile.txt
awk -F '\t' '{if(FILENAME!=$1){FILENAME=$1;print "Name \t State \t Country" > FILENAME}} {print $2 "\t" $3 "\t" $4 > FILENAME}' mainfile.txt
cat file1
Name State Country
abc def xyz
aaa pqr xyz
cat file2
Name State Country
lmn ghi xyz
bbb tuv xyz

参考资料

The header line: how to add, delete and ignore it
Adding header to sub files after splitting the main file using AWK Shell Programming and Scripting

R-Data-Science

Posted on 2016-09-29 | In R | Comments: | Views: ℃
| Words count in article: | Reading time ≈

本内容是基于R for Data Science的学习总结;

ggplot2的数据可视化

基本绘图

ggplot2画图基本模型如下:

1
2
ggplot(data = <DATA>) +    #生成一个空的图
<GEOM_FUNCTION>(mapping = aes(<MAPPINGS>)) #增加一个图层,其中涉及参数仅用于这一图层

GEOM_FUNCTION可划分为展示单变量,两个变量和三变量,连续型或离散型变量;
在ggplot2 中每一个GEOM_FUNCTION函数都包含有一个mapping参数对应于aes(x,y,size,shape,color,alpha),以上参数对应值均为DATA数据中的变量,若需要手动设置,将参数写于aes外,此时的参数对应值如下:

  • color=”颜色英语单词”
  • size=数字
  • shape=如下代表数字


  • 其中shape图形中的外边界由colour指定(0到18)。内部填充由fill指定。
    ggplot()中设置的aes相当于全局参数,为简化代码可将共有变量在ggplot中设置。若某一图层指定参数与次全局指定冲突,则在该图层使用geom指定的参数。基于这样的处理过程可以在不同的图层中指定不同的数据。
    1
    2
    3
    ggplot(data = mpg, mapping = aes(x = displ, y = hwy)) + 
    geom_point(mapping = aes(color = class)) +
    geom_smooth(data = dplyr::filter(mpg, class == "subcompact"), se = FALSE) ##se为是否展示置信区间

    stat (statistical transformation)

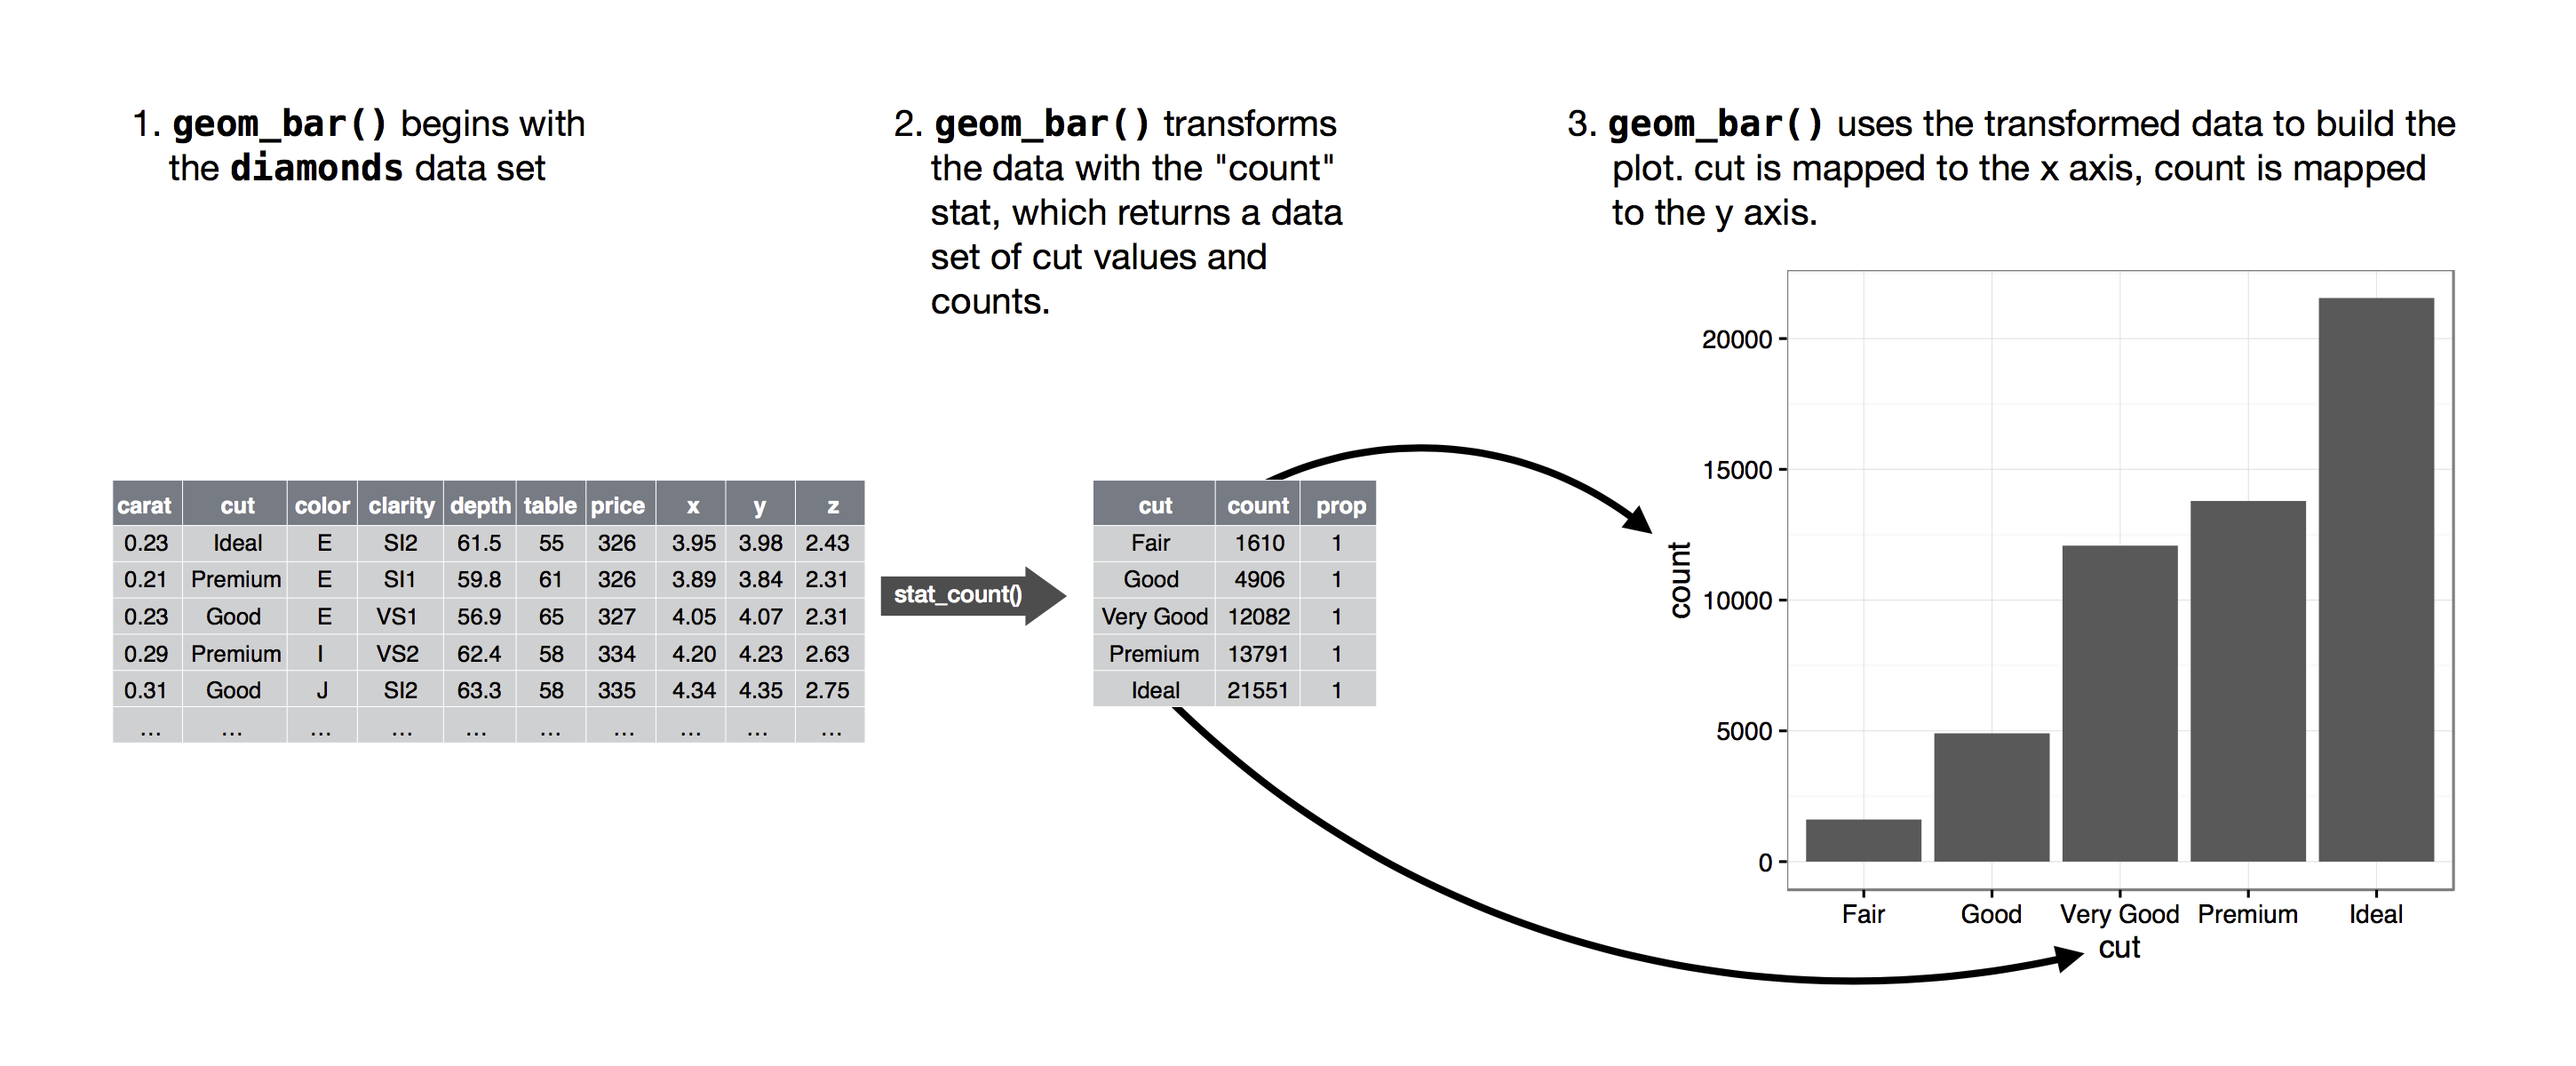
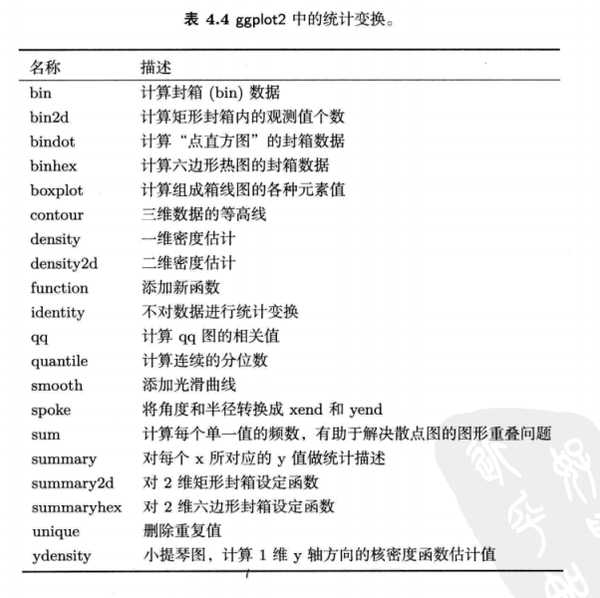
    每一个geom都会默认指定一个stat来对数据进行统计转换,如geom_bar()默认stat是count,即geom_bar(..,stat=”count”)。

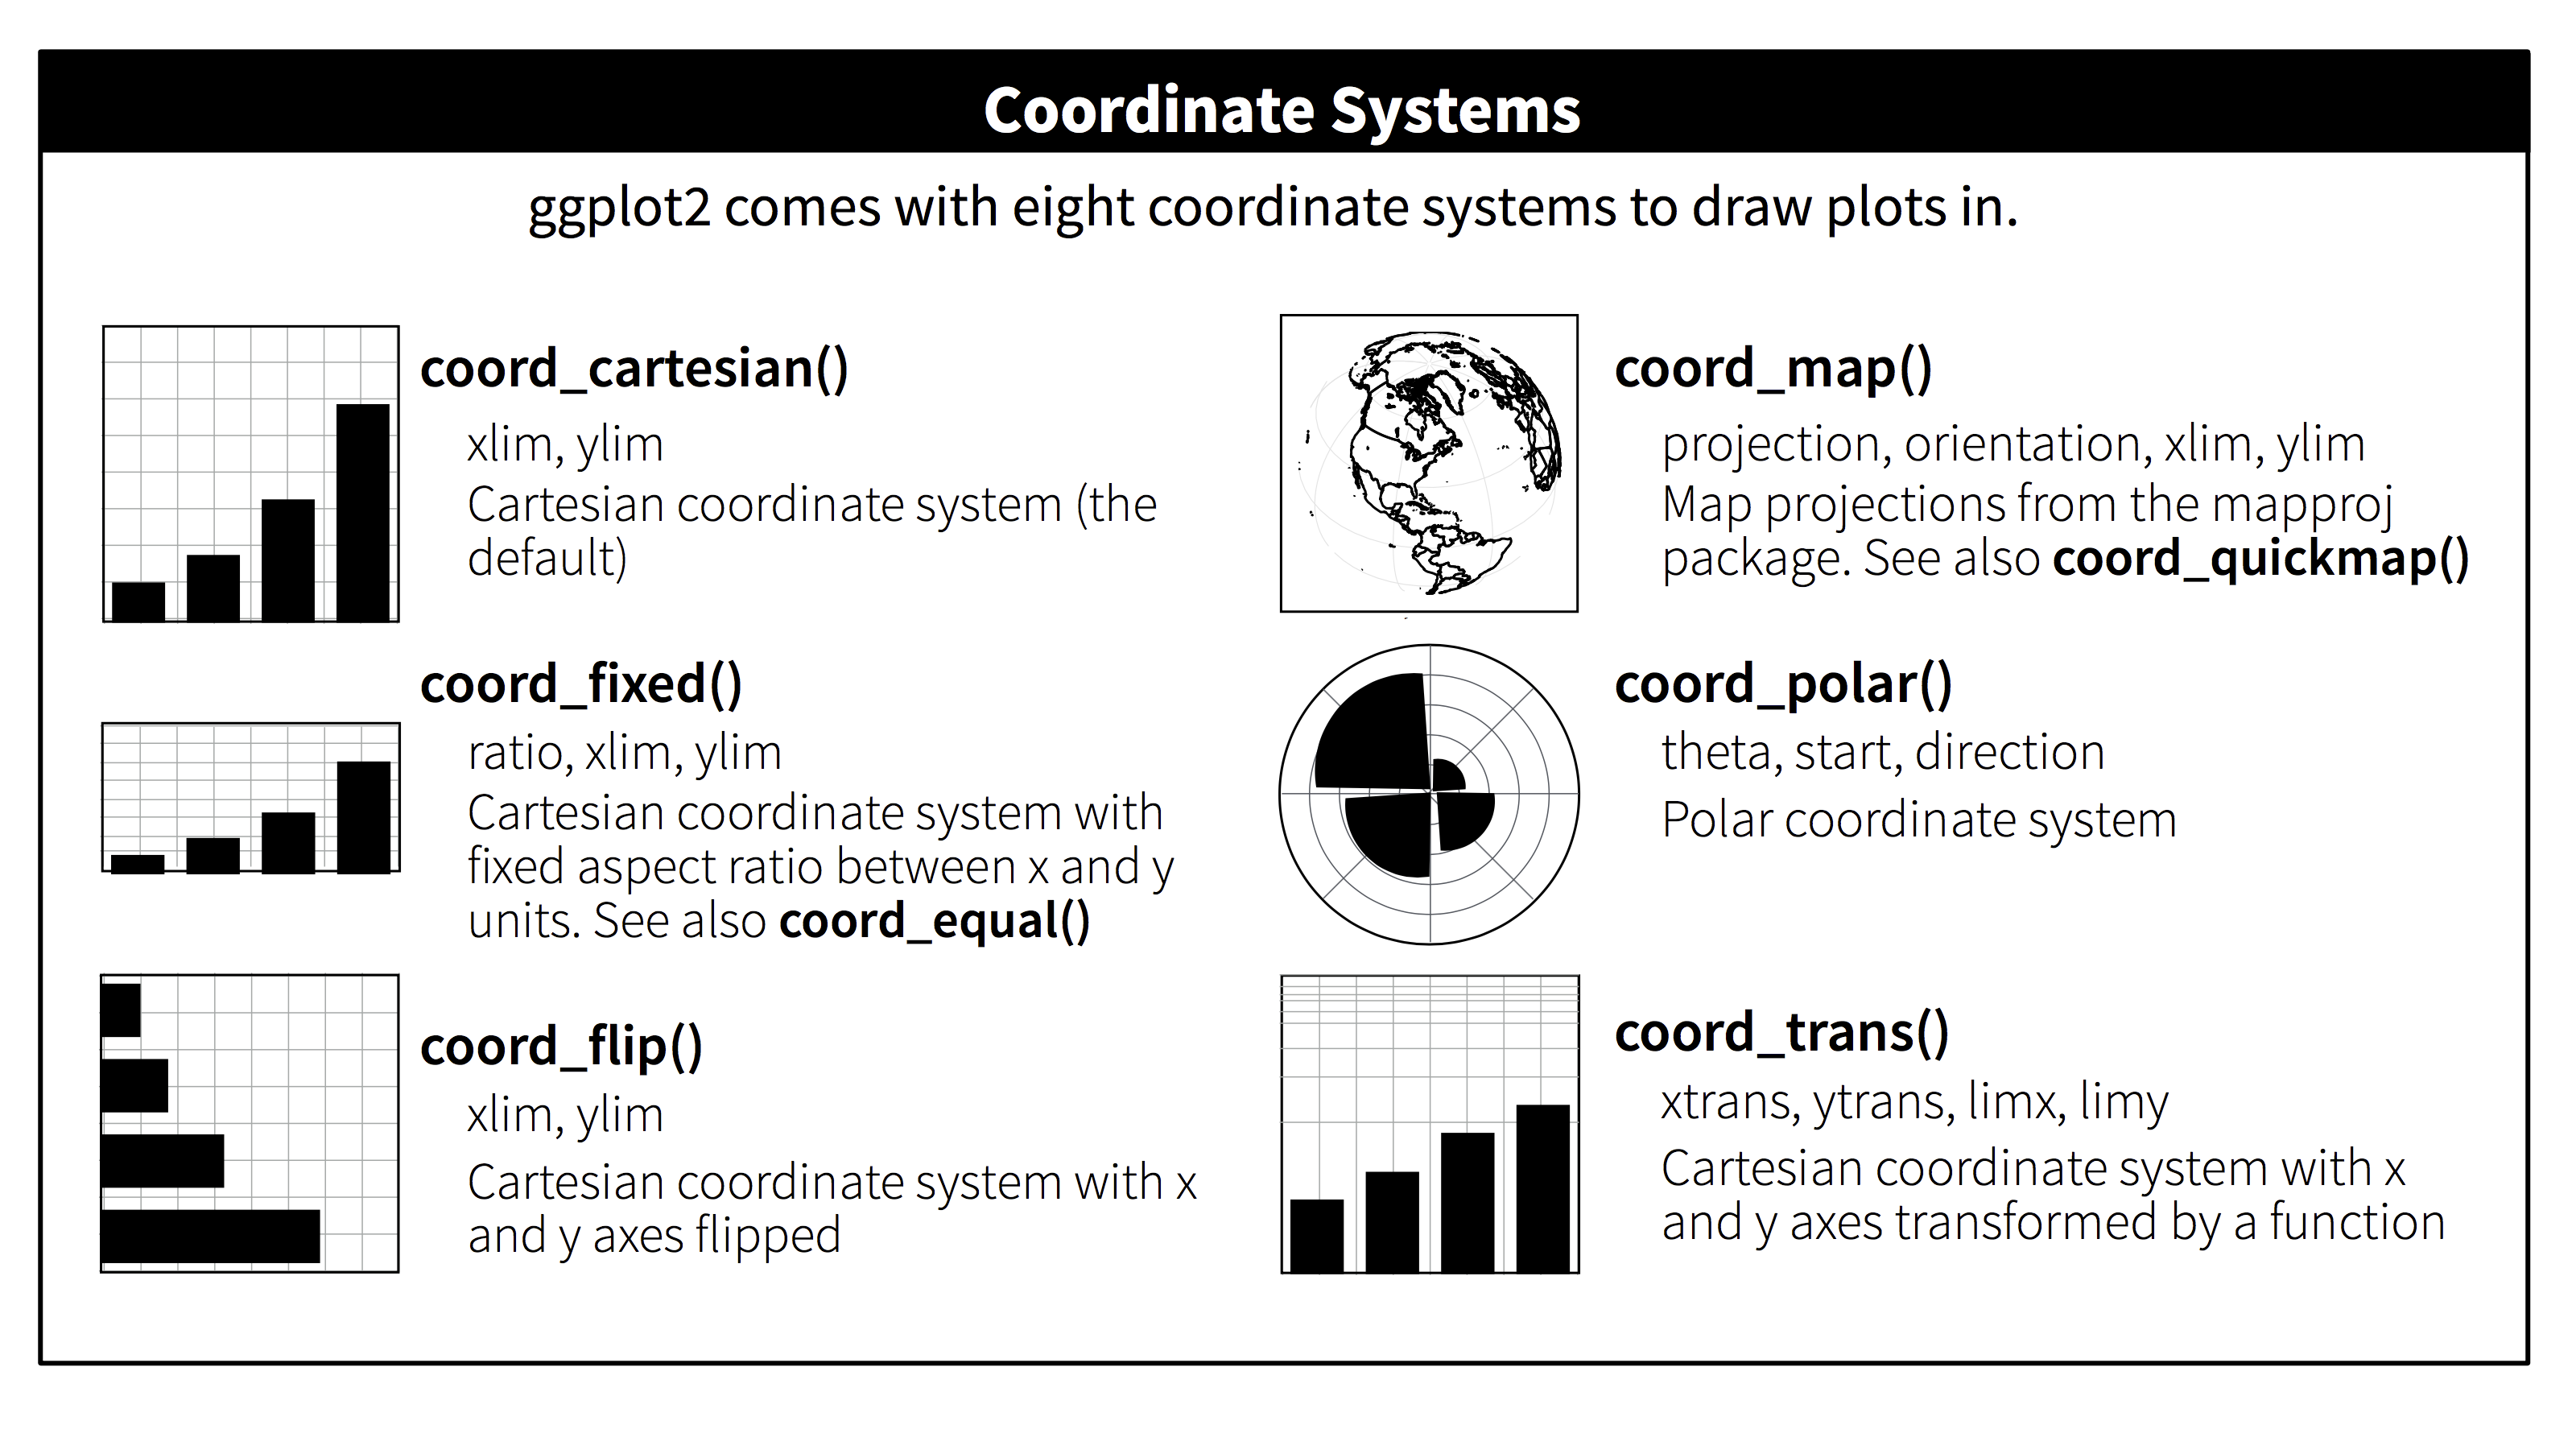
    坐标系统

    vim编辑器个性化配置总结

    Posted on 2016-09-21 | In Linux | Comments: | Views: ℃
    | Words count in article: | Reading time ≈

    Vim 终于发布了一个新的大版本 8.0

    安装

    下载安装最新版本的 Vim 的最好方式是使用 Git :

    1
    git clone https://github.com/vim/vim.git

    更多信息可参考: http://www.vim.org/git.php 。
    Windows下图形界面版: ftp://ftp.vim.org/pub/vim/pc/gvim80.zip 
    windows下next安装就可以。
    Vim安装完成之后,目录如下:

  • vim80:vim运行时所需的文件,对应目录为$VIMRUNTIME变量
  • vimfiles:第三方的文件,对应目录为$VIM/vimfiles
  • _vimrc:vim全局配置信息
  • 主题

    vimrc配置内容主要参考了http://blog.csdn.net/zhengzhoudaxue2/article/details/45247733

    注:_vimrc主题中参数解释见 http://edyfox.codecarver.org/html/_vimrc_for_beginners.html

    配置Vundle

    vim插件Vundle能够轻松的管理插件;

    下载Vundle

    在Vim/vimfiles路径下新建文件夹bundle,然后在此文件夹下克隆github上的vundel项目:

    1
    2
    3
    #以管理员权限运行cmd,进入bundle文件夹下
    cd Vim/vimfiles/bundle
    $ git clone https://github.com/VundleVim/Vundle.vim.git Vundle.vim

    配置Vundle

    在_vimrc文件中添加如下代码:
    以下英语输入法状态下的”符号是_vimrc中的注释符;

    1
    2
    3
    4
    5
    6
    7
    8
    9
    10
    11
    12
    filetype off

    " Vundle的路径
    set rtp+=$VIM/vimfiles/bundle/Vundle.vim
    " 插件的安装路径
    call vundle#begin('$VIM/vimfiles/bundle/')
    " 需要安装的插件
    Plugin 'gmarik/Vundle.vim'
    Plugin 'L9'

    call vundle#end()
    filetype plugin indent on

    注:若不指定call vundle#begin()中的路径参数,默认保存路径为C:\Users***.vim;

    vim中安装/卸载插件

    vundle主要是利用git,来处理自动安装,更新和卸载插件,所以首先需要安装git。

    vim插件安装方式

    _vimrc指定的vim插件安装有4种方式:

  • 1. 代码库放在github上

  •             Bundle ‘tpope/vim-fugitive’
                Bundle ‘Lokaltog/vim-easymotion’

  • 2. 代码库在vim script上

  •             Bundle ‘L9’
                Bundle ‘FuzzyFinder’

  • 3. 代码库在其他git库上

  •              Bundle ‘git://git.wincent.com/command-t.git’

  • 4. 当你自己写了个定制的插件,放在本地的时候

  •              Bundle ‘file:///Users/gmarik/path/to/plugin’

    常用的命令

    启动vim,键入

    1
    2
    3
    4
    5
    6
    :BundleInstall    安装插件
    :PluginInstall 安装插件
    :BundleInstall! 更新插件
    :BundleClean(!) 卸载不在.vimrc配置列表中的插件
    :BundleSearch(!) 搜索插件
    :BundleList 显示已安装插件列表

    如果想安装插件,首先在_vimrc中添加相应插件的Bundle,一般为Bundle ‘username/pluginname’的形式,如Bundle ‘gmarik/vundle’,然后打开Vim,输入一下命令,并等待Done即可,如果安装过程中出错,可以输入小写字母”l”查看日志;
    如果想卸载插件,只需在_vimrc中删除(或注释)相应的Bundle,然后打开Vim,输入相应命令。

    遇到的问题

  • 安装ctags遇到”Taglist: Exuberant ctags (http://ctags.sf.net) not found in PATH.Plugin is not loaded.”

  • 解决办法:ctags 目录下的 ctags.exe 复制到gvim.exe 所在的目录;

    参考资料

    Gvim各种插件配置(windows环境下) - vitah
    VIM插件管理—vundle
    Vim Skills——Windows利用Vundle和Github进行Vim配置和插件的同步
    _vimrc for beginners
    _gvim与插件的安装(ctag、taglist、cscope等)

    评估文库 Average Insert Size

    Posted on 2016-09-19 | In Bioinformatics | Comments: | Views: ℃
    | Words count in article: | Reading time ≈

    用SOAPdenovo对Illumina paired-end进行基因组组装时需要配置文件,其中要填写每个文库的average insert size,那么如何进行average insert size大小的评估呢?

    文库类型

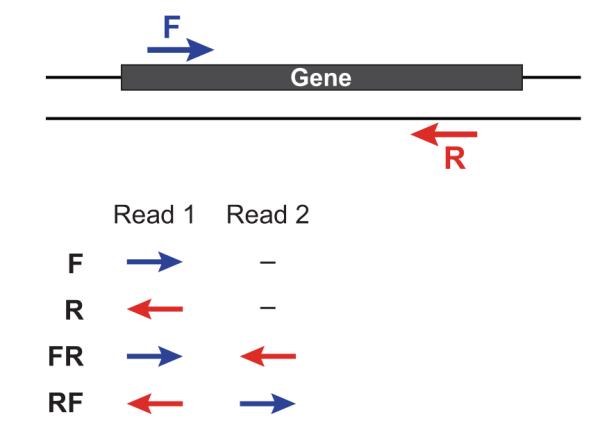
    对于基因组文库我们一般会建小库(<1K)的paired-end reads和大库的mate-pair reads,二者最主要的区别就是reads1和reads2的方向和之间的间隔大小。


    Read more »

    Congratulations For My First Paper

    Posted on 2016-09-13 | In Paper | Comments: | Views: ℃
    | Words count in article: | Reading time ≈


    Congratulations! My first SCI paper is published in scientific reports. A nice story about cottonseed and welcome reading.

    Read more »

    Awk Regular Expressions

    Posted on 2016-08-31 | In Linux | Comments: | Views: ℃
    | Words count in article: | Reading time ≈

    —re-interval

    在标准的正则表达式中{m}表示匹配字符m次,即[A-Z]{m}表示匹配A到Z的任意一个字符m次。,所以我们在awk中通常如下匹配:

    1
    2
    3
    4
    5
    cat test.txt
    12 AT CG
    7555 AAA AT
    878 GGGG CTG
    cat test.txt | awk 'BEGIN{FS=OFS="\t"} {for(i=1;i<=NF;i++) if ($i~/^[ATCG]{2}$/) print $i}'

    空,什么也没有输出?
    首先{m}属于基本的正则表达式,而awk只支持扩展的正则表达式;
    awk要想使用{m,n}类型的正则表达式,必须向awk提供参数:—re-interval 。

    1
    2
    3
    4
    cat test.txt | awk --re-interval 'BEGIN{FS=OFS="\t"} {for(i=1;i<=NF;i++) if ($i~/^[ATCG]{2}$/) print $i}'
    AT
    CG
    AT

    -v var=value or —asign var=value 赋值一个用户定义变量;

    1
    2
    3
    4
    5
    6
    7
    8
    9
    10
    11
    12
    $ awk -va=1 '{print $1,$1+a}' log.txt
    ---------------------------------------------
    2 3
    3 4
    This's 1
    10 11
    $ awk -va=1 -vb=s '{print $1,$1+a,$1b}' log.txt
    ---------------------------------------------
    2 3 2s
    3 4 3s
    This's 1 This'ss
    10 11 10s

    gensub()替换

    1
    2
     echo "123356" | awk '{print gensub("3","d",2)}'
    123d56

    gensub(a,b,c,d) a:匹配的字符,b替换的字符,c为指定替换目标是第几次匹配(如1,2,g),d为指定替换目标是哪个域如$1,$2,若无d指$0,返回值为target替换后内容(未替换还是返回 target原内容)。

    两个文本按条件合并

    1
    2
    3
    4
    5
    6
    7
    8
    9
    10
    11
    12
    13
    14
    15
    16
    [zpxu@node102 ~]$  cat 2.txt 1.txt 
    I0011 11111 hhh
    I0012 22222 kkk
    I0014 55555 ppp
    I0017 66666 ttt
    0011AAA 200.00 20050321
    0012BBB 300.00 20050621
    0013DDD 400.00 20050622
    0014FFF 500.00 20050401
    #比较 1.txt的1-4字符 和 2.txt的2-5 字符,如果相同,将2.txt 的全部列 与 1.txt 合并
    [zpxu@node102 ~]$ awk 'NR==FNR{a[substr($1,2,5)]=$0}NR>FNR&&a[b=substr($1,1,4)]{print $0, a[b]}' 2.txt 1.txt
    0011AAA 200.00 20050321 I0011 11111 hhh
    0012BBB 300.00 20050621 I0012 22222 kkk
    0014FFF 500.00 20050401 I0014 55555 ppp
    #NR==FNR处理的是2.txt文件,NR>FNR处理的是1.txt文件
    #awk 'NR==FNR{a[$1]=$2}NR>FNR&&a[$1] {print $1,a[$1]}' 2.txt 1.txt

    命令解释:首先处理2.txt文件,a[$1]=$0相当与将$1为键,整个行$0为值的hash;当处理1.txt文件时,直接在键的数组a中匹配1.txt中的$1列,若匹配则输出1.txt的$1和其在对应2.txt中匹配到的值;

    next与getline

    awk code: ‘BEGIN{…}{Main Input}END{..}’
    next 读入下一输入行并从(Main Input中的)第一个规则开始执行脚本。

    1
    2
    3
    4
    5
    6
    7
    8
    9
    [zpxu@node102 ~]$  cat data 
    name naughty
    25 shandong
    age 14
    ah,here is test
    [zpxu@node102 ~]$ awk '{if(NR==1){next} print $1,$2}' data
    25 shandong
    age 14
    ah,here is

    当记录行号等于1,就跳过当前行,其后面的print $1,$2也不会执行,读入下一行重新开始;
    next合并多行为一行
    可首先将两个或多个文件处理:cat a.txt b.txt | sort -n -k1 ,然后用next合并多行为一行来进行两个文本的按条件合并;

    1
    2
    3
    4
    5
    6
    7
    8
    9
    10
    11
    12
    13
    14
    15
    16
    17
    18
    19
    20
    cat data
    web01[192.168.2.100]
    httpd ok
    tomcat ok
    sendmail ok
    web02[192.168.2.101]
    httpd ok
    postfix ok
    web03[192.168.2.102]
    mysqld ok
    httpd ok
    awk '/^web/{T=$0;next;} {print T":\t"$0;}' data
    web01[192.168.2.100]: httpd ok
    web01[192.168.2.100]: tomcat ok
    web01[192.168.2.100]: sendmail ok
    web02[192.168.2.101]: httpd ok
    web02[192.168.2.101]: postfix ok
    web03[192.168.2.102]: mysqld ok
    web03[192.168.2.102]: httpd ok
    #行首匹配到web时将这一整行赋值给T存储起来,并读入下一行,最后将T和下一行一起print;

    与next相似,getline也是读取下一行数据。但是与next不同的是,next读取下一行之后,把控制权交给了awk脚本的顶部。但是getline却没有改变脚本的控制,读取下一行之后,继续运行当前的awk脚本。getline执行之后,会覆盖$0的内容。

    1
    2
    3
    4
    5
    6
    7
    [zpxu@node102 ~]$ cat d  
    $1=="name"{print $0;getline;print $0;}
    $1=="age"{print $0}
    [zpxu@node102 ~]$ awk -f d data
    name naughty
    25 shandong
    age 14

    getline从整体上来说,应这么理解它的用法:

  • 当其左右无重定向符 | 或 < 时,getline作用于当前文件,读入当前文件的第一行给其后跟的变量var 或$0(无变量);应该注意到,由于awk在处理getline之前已经读入一行,所以getline得到
    的返回结果是隔行的。
  • 当其左右有重定向符 | 或 < 时,getline则作用于定向输入文件,由于该文件是刚打开,并没有被awk读入一行,只是getline读入,那么getline返回的是该文件的第一行,而不是隔行。
  • 多行或多列的删除

    多行

    1
    2
    3
    4
    5
    6
    7
    8
    9
    10
    11
    12
    13
    14
    15
    16
    17
    18
    19
    20
    21
    [zpxu@node102 ~]$  cat 1.txt 
    1
    2
    3
    4
    5
    6
    7
    8
    9
    10
    11
    12
    [zpxu@node102 ~]$ awk -vD="1,3,5,8,11" 'BEGIN{split(D,a,",");c=1}NR==a[c]{c++;next}1' 1.txt
    2
    4
    6
    7
    9
    10
    12

    多列

    1
    2
    3
    4
    [zpxu@node102 ~]$  cat data 
    1,2,3,4,5,6,7,8,9,10,11,12
    [zpxu@node102 ~]$ awk --re-interval -vD='1,3,5,11' 'BEGIN{l=split(D,a,",")}{for(i=1;i<=l;i++){$0=gensub("(([^,]*,?){"a[i]-i"})([^,]+,?)(.*)","\\1\\4","1")}}1' data
    2,4,6,7,8,9,10,12

    参考资料

    Linux awk 命令
    awk函数+数组+多文件处理

    测序数据上传NCBI总结

    Posted on 2016-08-30 | In Bioinformatics | Comments: | Views: ℃
    | Words count in article: | Reading time ≈

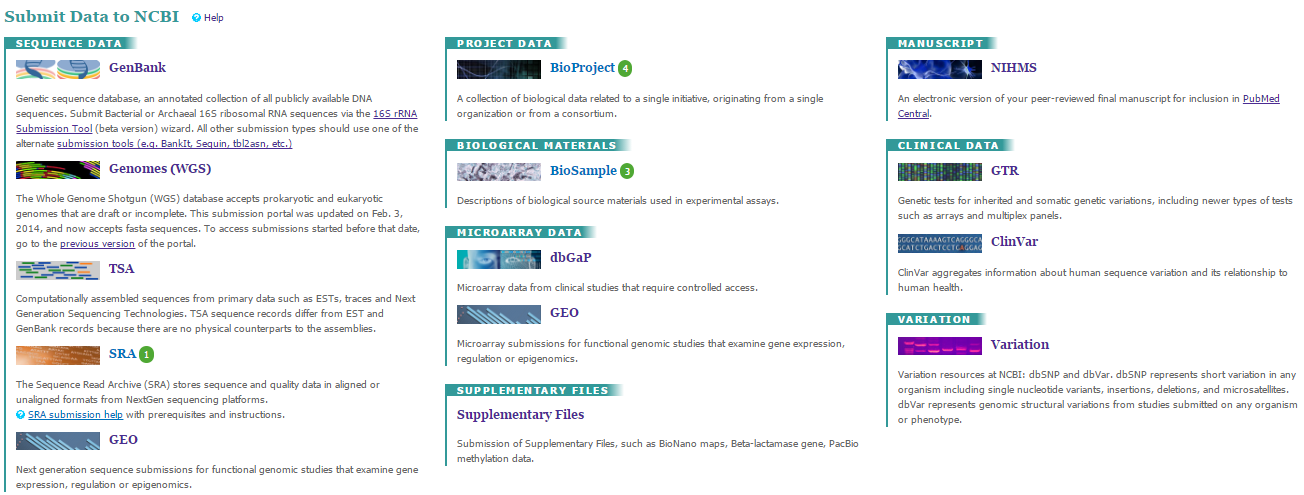
    测序数据上传到NCBI的SRA数据库;
    上传首页:https://submit.ncbi.nlm.nih.gov/
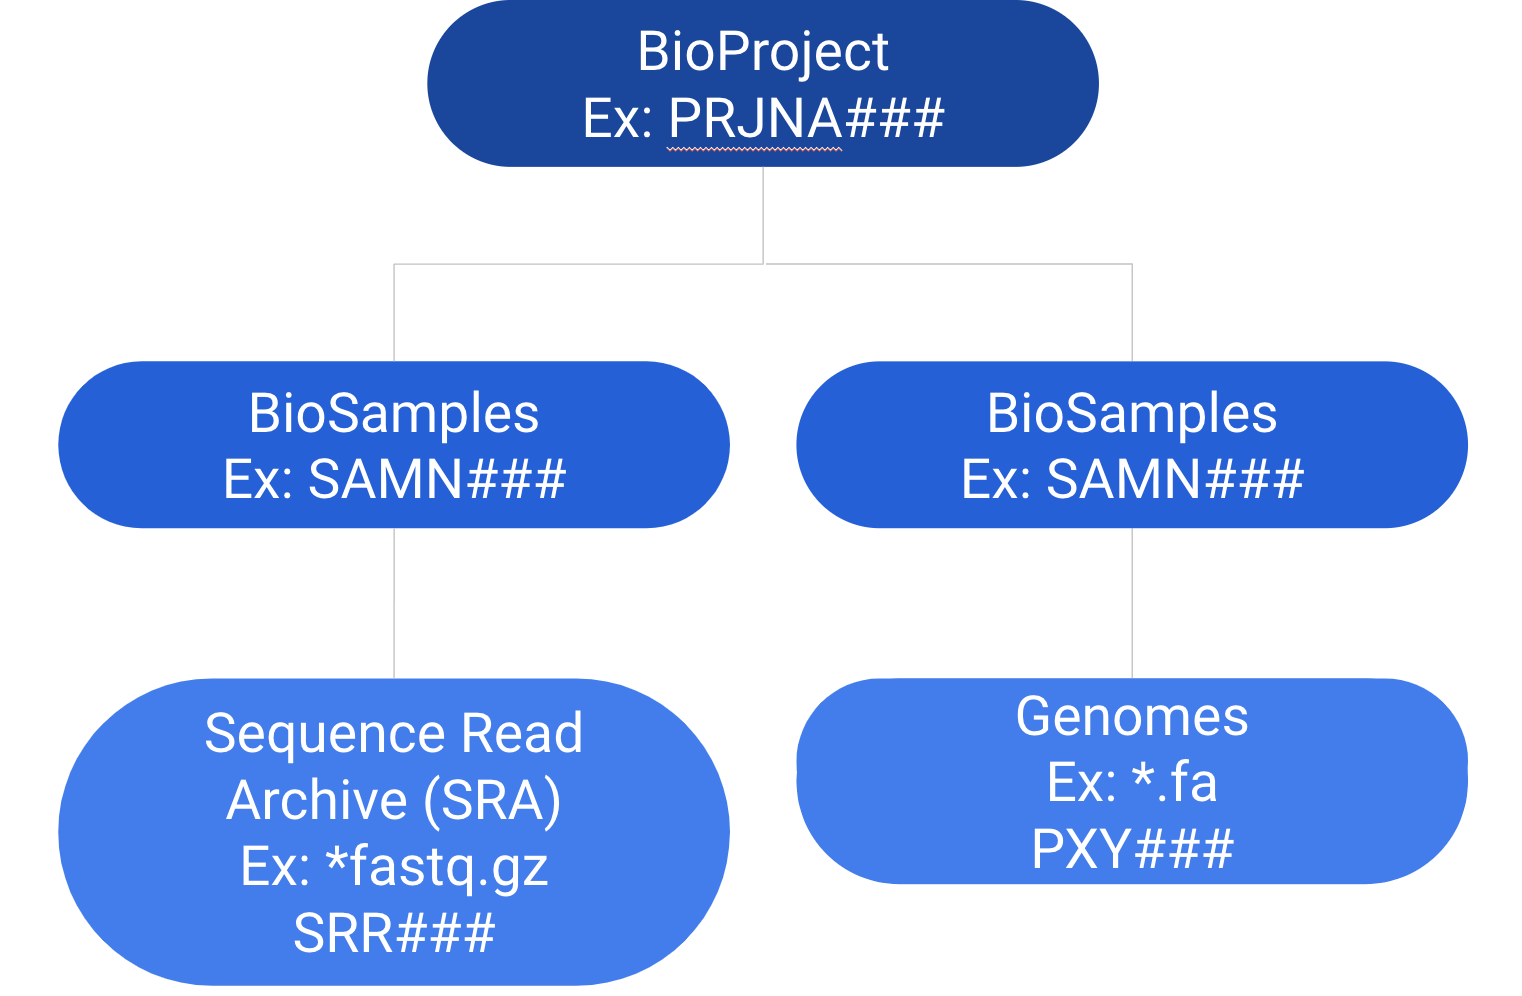
    上传整体顺序为:BioProject,BioSample,SRA

    需要注意的是,上传的过程中很多地方一旦保存或提交就不可以修改,尤其是各处的Alias,所以想清楚后再保存,可先看下别人的数据提交形式;确实需要修改的可以发邮件联系NCBI的工作人员修改内容。

    Read more »

    Metagenome:宏基因组介绍

    Posted on 2016-08-28 | In molecular biology | Comments: | Views: ℃
    | Words count in article: | Reading time ≈

    概念

    宏基因组( Metagenome)(也称微生物环境基因组 Microbial Environmental Genome, 或元基因组) 。定义为”the genomes of the total microbiota found in nature” , 即生境中全部微小生物遗传物质的总和。它包含了可培养的和未可培养的微生物的基因, 目前主要指环境样品中的细菌和真菌的基因组总和。
    宏基因组学(或元基因组学, metagenomics)就是一种以环境样品中的微生物群体基因组为研究对象, 以功能基因筛选和/或测序分析为研究手段, 以微生物多样性、 种群结构、 进化关系、 功能活性、 相互协作关系及与环境之间的关系为研究目的的新的微生物研究方法。

    Read more »

    Post-Translational Modifications (PTMs):Phosphorylation

    Posted on 2016-08-27 | In molecular biology | Comments: | Views: ℃
    | Words count in article: | Reading time ≈

    Introduction

    PTM


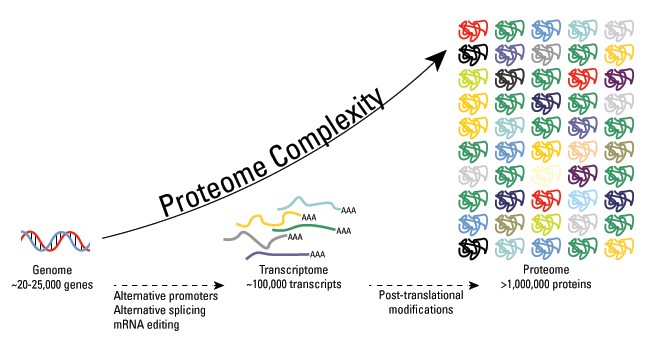
    Post-translational modification (PTM) serves as molecular switch mechanism, modulating diverse protein functions including enzymatic activity, protein turnover, interactions, conformation, localization, and crosstalk with other PTMs, which in turn regulate broad cellular biological functions.
    These modifications include phosphorylation, glycosylation, ubiquitination, nitrosylation, methylation, acetylation, lipidation and proteolysis.

    Read more »

    PacBio sequence error correction amd assemble via pacBioToCA

    Posted on 2016-08-27 | In Bioinformatics | Comments: | Views: ℃
    | Words count in article: | Reading time ≈

    Illumina二代测序有个致命缺陷,说到底还是基于PCR扩增的,所以存在偏向性和对于高GC含量区无法扩增等系统误差,测序错误是不可避免的,其次就是测序长度短;但其价格便宜,通量非常高,准确性达99%,综合性价比也受到青睐。短序列的reads在做基因组装的时候,遇到大的重复片段就会很吃力。

    10X Genomics

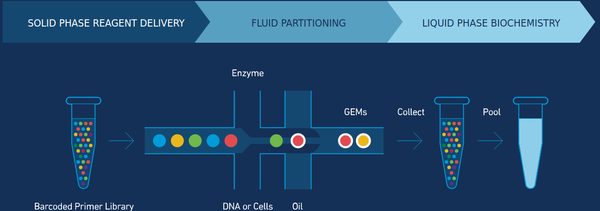
    2015年备受瞩目的测序黑马:10X Genomics,是常规Illumina二代测序的升级版,由于开发出了一套巧妙的Barcoding建库方案,使得Illumina这种短读长二代测序能够得到跨度在30-100Kb的linked reads信息,与二代测序数据相结合,在Scaffold的组装上能够得到媲美三代测序的组装结果;

    Read more »
    1…567…15
    tiramisutes

    tiramisutes

    hope bioinformatics blog
    148 posts
    17 categories
    112 tags
    RSS
    GitHub E-Mail Weibo Twitter
    Creative Commons
    Links
    • qRT-PCR-Pipeline
    • GitBook《awk学习总结》
    • 棉花遗传改良团队
    • 生信菜鸟团-深圳大学城
    • 生信技能树
    • rabbit gao's blog
    • Huans(代谢+GWAS)
    • NSC-sequenceing
    • 伯乐在线
    • Linux开源中文社区
    • R-bloggers
    • R-resource
    • ggplot2
    • pele' blog
    © 2014 – 2023 tiramisutes
    Powered: Hexo
    |
    ▽ – NexT.Muse
    The total visits  times
    0%